
Vacuum Forming Sourcing Guide: Tooling, Materials and Draw Ratio
 ·
Updated October 10, 2026
·
23 min read
Vacuum forming looks like the simplest plastics process there is, which is exactly why so many buyers get it wrong. A flat sheet is heated until it goes soft and pulled down onto a mould, so the mould only has to shape the sheet rather than fill a cavity with it — and that is why the tooling is cheap, the first sample arrives fast, and the process is easy to sell. What the brochure leaves out is that the wall is already decided by the sheet you chose and the depth you asked for, that a sharp corner cannot be vacuumed into shape, and that a hollow closed part is a different process wearing the same name. This guide covers which version of the process your part actually needs, which sheet is allowed to touch food, what the draw ratio does to your wall, where the tooling money really goes, and where a cheap quotation takes its money back.

Four Sheet-Forming Routes, Chosen by the Part
| If your part is | The route | What that buys you |
|---|---|---|
| Flat or shallow, thin wall, made in volume | Vacuum forming | The cheapest mould and the fastest first sample, with a wall that follows the sheet you fed in |
| Full of sharp corners, fine texture or crisp lettering | Pressure forming | Air pressure pushes the sheet into detail that vacuum alone leaves soft and rounded |
| Hollow and closed — a tank, a duct, a float, a pallet deck | Twin-sheet forming | Two formed sheets welded into one hollow body, so there is no second part to assemble or seal |
| Low volume, a shell over a shape, a quick fit check | Drape forming | A male mould and no vacuum, but only the outside face is controlled and the inside is whatever the sheet thickness gives you |
What Is Vacuum Forming, and Where Does the Money Actually Go?
Vacuum forming is a sheet process, not a mould-filling process. A flat sheet of plastic is clamped in a frame, heated until it sags, then pulled down onto a single mould by vacuum so it takes the mould's shape. Because the plastic already exists as a sheet, the mould never has to contain molten plastic under pressure — it only has to hold a soft sheet while air pressure outside pushes it into place. That single difference explains almost everything buyers notice about the process: the tooling is cheap, the tooling is fast, and the wall thickness is not something the mould can fix.
Because the sheet arrives at its final thickness, the buying conversation has three parts, and they are not equally important:
- The sheet
- This is the largest share of the unit price and the one item that never goes away. Sheet is bought by weight or by area, and it is priced by the polymer, the thickness and whether the surface is glossy, matte or textured. A part that wastes sheet — a wide flange, a deep cavity, a spare border the machine needs to grip — pays for that waste on every single piece.
- The mould
- This is a one-time cost, and it is small next to injection tooling. It is also the cost buyers most often compare wrongly: a cheap mould that produces a soft corner or a short-lived surface is not a saving if the geometry was wrong from the start.
- Trimming and second operations
- Forming produces a shaped sheet, not a finished part. Something has to cut the part out of the sheet, and something has to add holes, slots, printing, laminating or assembly. On many parts the trimming method is chosen before the mould is cut, because a mould built for hand trimming and a mould built for a steel trimming die are not the same mould.
The mistake buyers make is treating the mould price as the decision. It is the smallest number in the quotation, and the sheet and the trim are what you keep paying after the first order. If the geometry is not right, the cheapest mould is the most expensive choice you can make.
One number is worth knowing before you compare anything: the ratio of the sheet's area to the part's footprint. A part that needs a large flange or a deep draw consumes far more sheet than its own surface suggests, and that ratio is set on the drawing, not on the shop floor. If you want to see the same logic applied to a mould that does contain molten plastic under pressure, the comparison is worth making once — the tooling bill behind a vacuum forming explains why the tooling gap between the two processes is so wide.
When Is Vacuum Forming the Right Process, and When Is It the Wrong One?
The short answer is to look at three things at once: how deep the part is compared with its width, how tight the wall tolerance has to be, and how many pieces you need. Vacuum forming wins when the part is shallow relative to its size, when the wall only has to be roughly consistent, and when the volume is small enough that a cheap mould matters or high enough that sheet cost is manageable.
It is the wrong process in four cases, and buyers meet all four:
- When the wall has to be exact. A formed wall thins wherever the sheet stretches, so the deepest point is the thinnest point. If the drawing says the wall must be 2.0 mm everywhere, no sheet-forming route will hold that. Only a process that fills a cavity can.
- When the corner has to be sharp. Stretching a sheet around a tight corner thins it and often tears it. Sharp geometry is pressure forming's job, and if the corner is sharper still, it is not a sheet process at all.
- When the part has to carry a real load in a small space. Rigid, stiff, load-bearing parts with ribs and bosses are the natural home of injection moulding, the same way a heavy industrial tote or a crate is built that way rather than formed. If your part is closer to a box than a cover, it is worth checking how the same decisions play out on the container matched to a vacuum forming before you commit to a sheet.
- When the part is closed and hollow. Vacuum forming shapes one open side. A closed body — a bottle, a float, a sealed housing — either needs twin-sheet forming or a different process entirely. Blow moulding is the usual answer for a sealed hollow body with a neck, which is why blow moulded bottles and trays are bought from completely different factories.
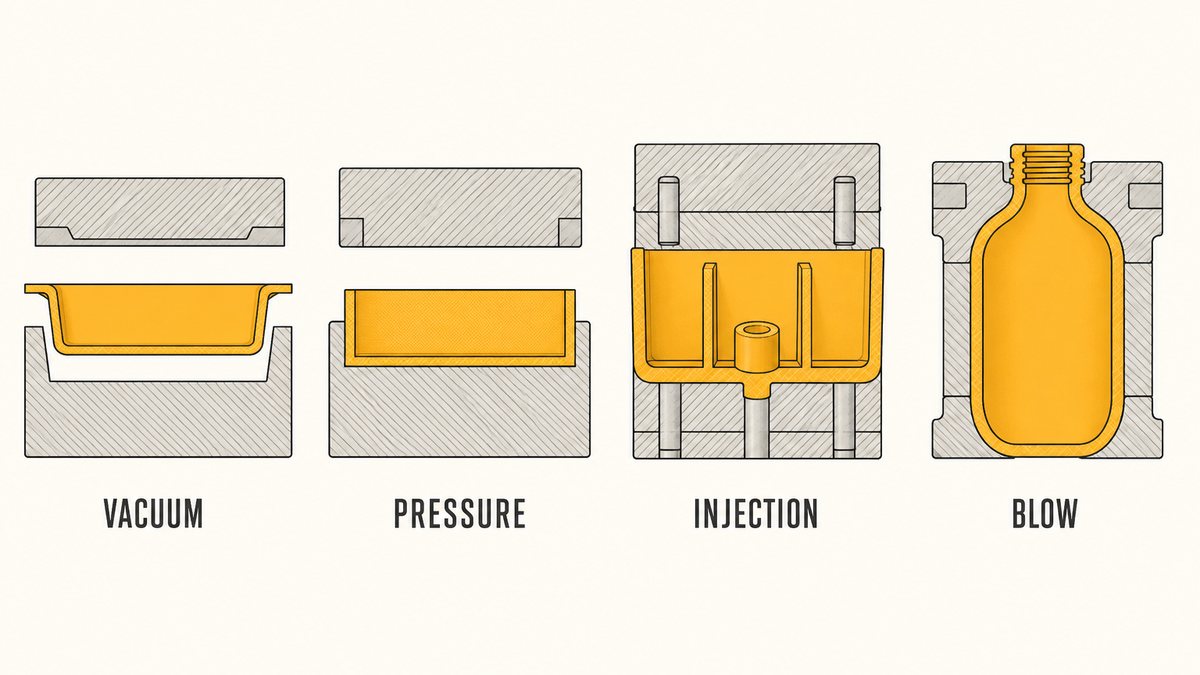
There is a quiet fourth answer people forget. If the part is mostly flat with a slight shape to it — a cover, a lid, a fascia, a liner — vacuum forming is usually cheaper than injection moulding at low volume, and it stays competitive until the volume is high enough to pay for a steel tool. That crossover volume is worth calculating rather than guessing, because it depends on how much sheet the part eats and how long the injection tool would take to pay itself back. An injection moulded enclosure and a pressure formed one can look identical on a shelf and be built from completely different economics — injection moulded enclosures show where that line usually falls.
Vacuum Forming, Pressure Forming, Twin-Sheet and Drape Forming: Which One Do You Need?
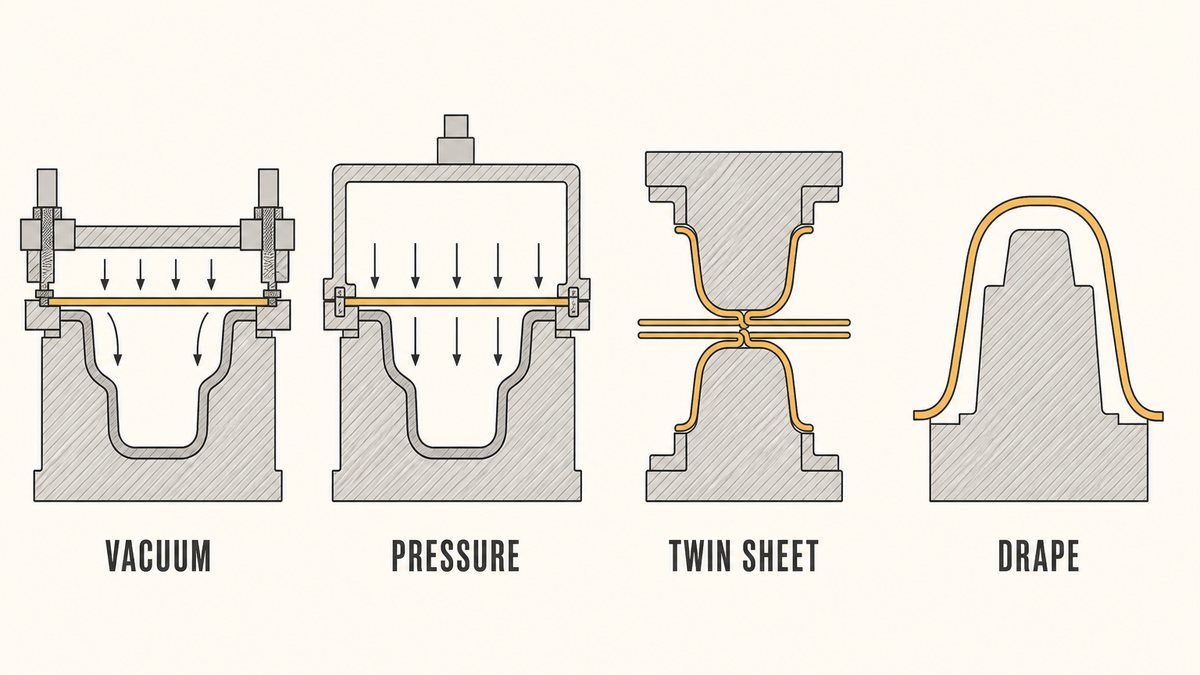
All four routes heat a plastic sheet and shape it against a mould. What separates them is how much force pushes the sheet into the mould, and that single difference decides how sharp the detail can be and how much the wall thins.
Vacuum forming
Atmospheric pressure alone pushes the sheet down. It is the cheapest and most common route, and it is soft on detail: corners come out rounded and inside faces follow the sheet's own thickness. Use it for trays, liners, covers, and anything where the outside shape is the only thing that matters.
Pressure forming
Compressed air is added on the outside while vacuum pulls on the inside, so far more force presses the sheet into the mould. This is how you get crisp corners, moulded-in lettering, fine texture and a part that reads as injection moulded. It costs more per piece because the pressure needs stronger moulds and slower cycles.
Twin-sheet forming
Two sheets are formed separately, then welded together along their flanges while still hot, producing one hollow body with an internal cavity. It is how you make a closed part — a tank, a duct, a float, a double-wall deck — without assembling two halves. The weld line is the part that has to be specified, because it is where a twin-sheet part fails.
The fourth route, drape forming, is the low-volume cousin: the sheet is pulled down over a male mould with little or no vacuum assist. It is the fastest way to a fit check, because the mould can be a simple shape rather than a machined cavity. What you give up is the inside face — with drape forming over a male mould, only the outside is controlled, so the wall is whatever the sheet thickness happens to leave.
Choosing between them is not a preference, it is a deduction from the drawing. Deep and soft on detail points at vacuum forming. Sharp and textural points at pressure forming. Closed and hollow points at twin sheet. Undecided and low volume points at drape forming for the sample, then one of the other three for production.
Which Plastic Sheet, and What Does Each One Buy You?
Sheet is chosen by what the part has to survive, not by what looks good on a sample. Six questions sort almost every job: does it touch food, does it face sunlight, does it need to be see-through, does it have to be tough when cold, does it have to resist a chemical, and does it have to be recycled or recyclable.
- Food contact
- This is a materials question with a paper answer. The sheet has to be made from a polymer that appears on the permitted list for the market you are selling into, and the converter has to be able to show the document. Two common choices are the olefin family covered by 21 CFR 177.1520, the rule for olefin polymers in the United States, and the positive list approach used for plastic food contact materials in the European Union under Regulation (EU) No 10/2011. The trap is that the sheet is not the only thing that touches the food — printing inks, adhesives and coatings on the part are all inside the same question.
- Clear or opaque
- Clarity is a property of the polymer, and it is also the first thing that punishes you on cost. A clear retail blister is a different sheet from a black industrial liner, and if the customer only needs to see one side, an opaque sheet with a window is often cheaper than forming the whole part clear.
- Toughness when cold
- Sheet that survives a warm warehouse can crack in a cold container. This is measured rather than argued about: a falling-weight impact test on plastic sheet follows a published method, and ASTM D1790, the standard test for plastic sheet impact resistance is the one to ask for when a part has to survive a winter shipment. Asking for the test result is a more useful conversation than asking whether the sheet is "strong".
- Chemicals
- Every sheet has solvents it dislikes. If the formed part will be wiped with a cleaning agent, sit against an oil, or hold a product that outgasses, that medium belongs in the specification. "Chemical resistant" on its own means nothing, because resistance is a result at a named temperature and time, not a label on a shelf.
- Static
- Parts that hold circuit boards need a sheet that drains static rather than storing it, and that is an additive in the sheet rather than a treatment on the formed part. If your part protects electronics, say so before the sheet is ordered, because this changes the material and the price together.
- Recycled content
- Recycled sheet is widely available and increasingly requested, and it behaves differently from virgin sheet in forming — the temperature window is narrower and the surface is less even. If a recycled grade is part of the promise you are making to customers, it has to be specified at the sheet stage, because a converter cannot add recycled content to a part after forming.
The practical order is to fix the polymer and the thickness first, then argue about finish. Buyers who start with the finish and work backwards end up paying for clarity they did not need, or discovering that the attractive matte surface they chose has narrowed the forming window and raised the scrap rate.
Tooling Classes, and What Actually Sets the Mould Price
Three things set the price of a forming mould: what it is made from, how many parts it has to survive, and how faithfully it has to hold detail. Nothing else moves the number much. This is the opposite of injection tooling, where the price is driven by the steel, the number of cavities and the complexity of the cooling — a forming mould has no molten plastic to contain, so it does not need the same strength.
In practice buyers meet three classes of mould, and the mistake is almost always the same: using the first class to serve the third class's volume.
- 1. Sample and fit-check moulds
- Cut from tooling board, resin, gypsum or soft wood, and turned around in days. They are the right answer for approving shape, fit and the position of a cut line, and they are the wrong answer for anything else. A sample mould loses its surface after a short run, and the parts from it do not match the parts from a production mould closely enough to qualify a packing line. Accepting samples from a sample mould when production will run on aluminium is the single most common source of "the first shipment does not fit" complaints.
- 2. Production moulds
- Machined from aluminium, with drilled vacuum channels and cooling passages worked into the block. They hold their surface, release the part cleanly, and run for a long service life. This is the class that most parts should be made on, and the class where it is worth asking to see the drawing rather than the price — vent placement and cooling layout are what separate a fast mould from a slow one.
- 3. High-volume tooling with a trim die
- When the volume is large, the mould is paired with a steel trimming die instead of a hand or CNC trim, and the two are designed together. At that point the mould is no longer a stand-alone item, and the decision about trimming has to be made before the mould is cut. The retail packaging end of this process has its own tooling ladder and its own price bands, and the deep version of that ladder is already written up in our guide to the blister pack for a vacuum forming, which covers the draw-ratio and wall-thinning rules for thin retail sheet in detail.
Two clauses belong in every forming order, and neither is about price. The first is who owns the mould after the order: a forming mould is cheaper than an injection tool, which makes it tempting to let the converter keep it, and that is exactly how buyers lose the ability to move production later. The second is whether the mould may be moved to another converter at all, and in what condition. Both are the same conversation as tool ownership after a vacuum forming order, and the answers belong in the purchase order, not in an email thread.
Before any of that, the geometry has to be checked against what a sheet can do. A drawing that a machinist would call simple — a deep pocket with square internal corners — is not a simple forming job at all, and the fix belongs on the drawing. Running a reviewing a vacuum forming design before tooling on the CAD file before the mould is quoted costs almost nothing and is the cheapest error you will ever avoid.
Draw Ratio and Wall Thinning: the Two Numbers on Your Drawing
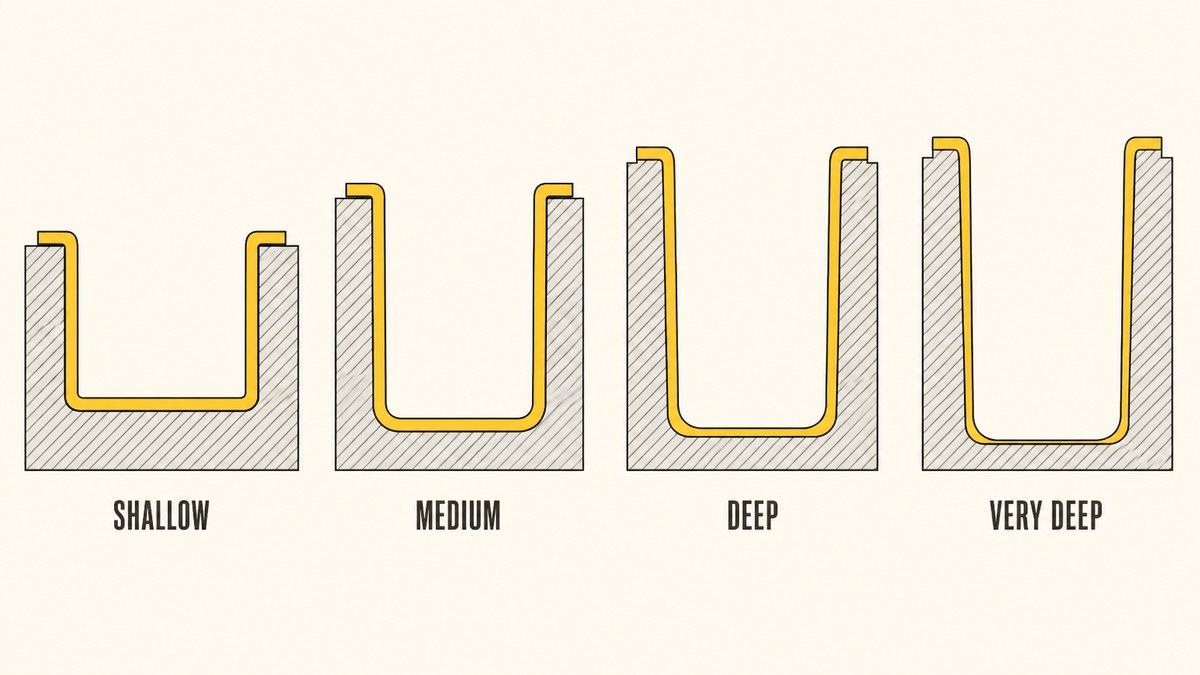
The wall of a formed part is not a constant, and this is the fact that separates buyers who get what they asked for from buyers who get a complaint. When a sheet is stretched into a cavity, the material thins wherever it stretches furthest. On a simple tray the difference is small. On a deep draw the bottom can end up a fraction of the sheet thickness you paid for, and the corners are thinner still.
The ratio that governs this is the draw ratio: the depth of the part divided by its narrowest width. As that number grows, the wall at the deepest point gets thinner, and the shape of the cavity matters as much as the depth does. A deep draw with generous corner radii distributes the stretch. A deep draw with sharp corners concentrates it in one band, which is where the part tears or goes into pinholes.
- Keep it shallow if you can
- A part whose depth is a small fraction of its width forms with a nearly even wall. Everything downstream — stiffness, packing, stacking, sealing — is easier and cheaper at that shape. If the drawing allows a shallower part, the shallower part is better.
- Round every corner you are allowed to round
- Corners are where the sheet is asked to change direction fastest, and change of direction is what thins it. Generous radii in the plan view and a draft angle on every vertical wall let the sheet slide instead of stretch. A draft angle is also what lets the part come off the mould at all.
- Say which face matters
- Vacuum forming controls the face that touches the mould. If the part is formed onto a female cavity, the outside is the controlled face and the inside is rough. If it is formed over a male mould, the opposite is true. Tell the tool shop which face the customer sees, because it decides the mould's sex and that decision cannot be reversed later.
- Measure the thinnest point, not the average
- When you approve a sample, cut it and measure the wall at the deepest point and at the corners. A supplier who reports the sheet thickness rather than the formed wall has told you what they fed the machine, not what you received. If your part has a stiffness requirement, the number that matters is the thin one.
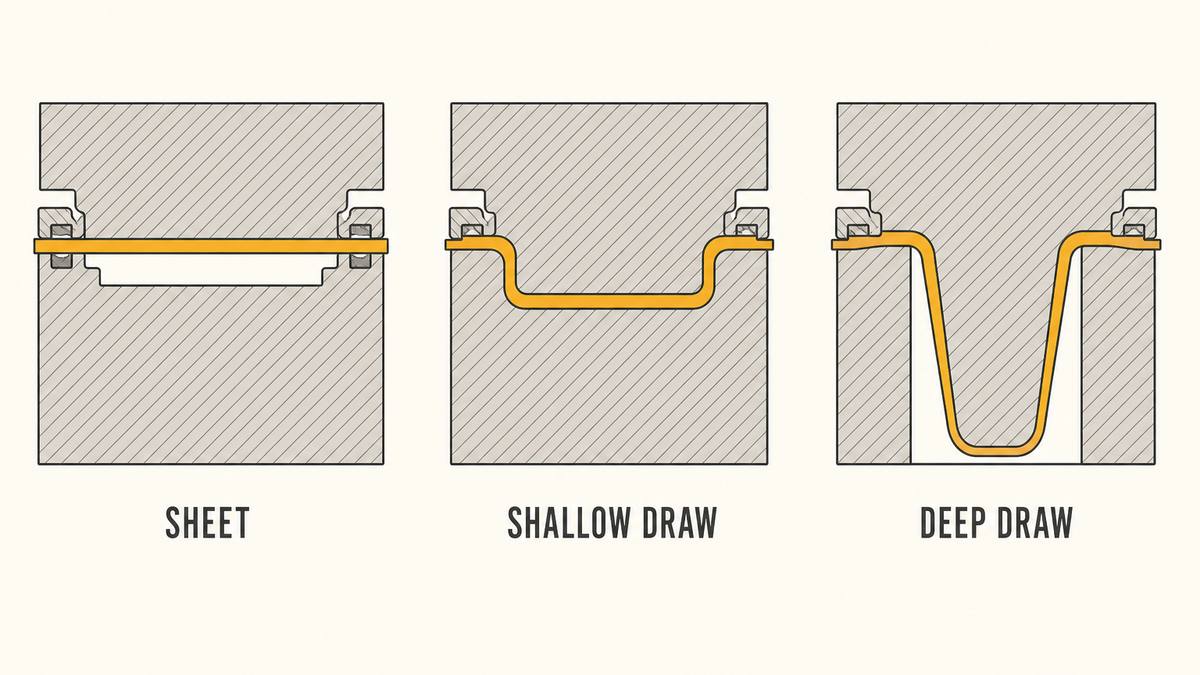
The two numbers worth writing on the drawing are the sheet thickness you are buying and the minimum wall you will accept at the worst point. A drawing that gives only the first one has left the second one to chance, and chance is what a forming supplier will quote against.
Sheet Thickness, Part Size and What the Machine Decides for You
Before any of the engineering matters, the part has to fit a machine. Forming machines are built around a platen size and a maximum draw depth, and both limits are hard: a part larger than the platen cannot be formed on that machine no matter how good the drawing is, and a part deeper than the machine's maximum stroke cannot be drawn in one piece.
This is why the same drawing can come back with very different quotations from two suppliers. One of them has a machine that swallows the part comfortably. The other has to run it in two halves, or hand off to a shop with a bigger press, and both of those show up in the price. When you compare forming quotes, the first question is not the rate — it is which machine the part was priced on, and whether that machine exists.
Sheet thickness then sets three things at once. Thicker sheet gives a thicker formed wall for the same geometry, a stiffer part, and a heavier part. It also costs more per piece, heats more slowly, and can need a longer cycle. There is no single right answer, but there is a wrong way to choose: picking the thickness from the finished part's feel rather than from the load it has to take. A shallow part that only has to hold its own shape and look right can often be formed from noticeably thinner sheet than a buyer's instinct suggests, and the saving is real because sheet is the recurring cost.
There is one exception worth knowing, because it explains a whole family of parts. When the requirement is a hollow body rather than an open shape — a tank, a float, a double-wall deck, the kind of panel used on choosing a pallet for a vacuum forming — twin-sheet forming makes the closed body from two sheets in one operation. That route has its own machine envelope, because the two halves have to be formed and then pressed together before they cool. It also has a rule that open forming does not: the weld between the two sheets is a structural joint, and its width and quality decide what the part can hold.
Trimming and Secondary Operations: Where the Cost Hides
A forming machine makes a shaped sheet with parts on it, joined by the frame that the machine needed to grip. Turning that into a finished part is a separate operation, and it is where quotations differ most while looking most similar.
There are three normal answers. Hand trimming with a template and a knife or router is the cheapest to set up and the slowest per piece, and it is fine for short runs and simple outlines. A CNC trim cuts each part from a program, giving a repeatable outline and clean internal cut-outs, at a higher setup cost that pays back quickly. A steel trim die cuts the part in one stroke and is the fastest and the most expensive to build, so it belongs to high volume and to parts whose outline has to be identical on every piece.
The trap is a quotation that names the forming step and stays quiet about the rest. Four secondary items decide the real unit price, and all four should be listed separately so you can compare them:
- Cutting the outline, including the internal cut-outs and slots, and whether the trimming method matches the volume.
- Printing and decoration, because a formed part is a three-dimensional surface. Screen printing on a flat sheet then forming it is a different job from printing after forming, and the sequence changes both the tooling and the risk of the print stretching out of register.
- Assembly and fittings, from welding two parts together to inserting clips, rivets or grommets. Anything inserted is a part you now have to buy, store and inspect.
- Packing, because formed parts nest badly when they are rigid. A tray that stacks well empty may need separators or a carton for every few pieces, and that packing cost is real and often invisible in the unit price.
A quotation that shows all four lines lets you see which one you can design out. A quotation that shows one line is not a shorter quote — it is a quote you will be asked to add to later.
What Drives the Unit Price, and How to Compare Two Forming Quotes
Forming is priced from the sheet up, so the unit price is mostly a materials price. Five things move it, and only one of them is the supplier's rate.
- Sheet
- The polymer, the thickness and the width of the roll or plank decide most of the cost. This is also the line where two quotations most often differ without either of them being wrong: one supplier priced clear sheet and the other priced opaque sheet with a window, and both answered the question they were asked.
- Sheet waste
- Whatever the part does not use is paid for and thrown away. A deep draw, a wide flange or a generous border for the machine to grip all raise the waste, and the waste is charged on every piece. Trimming the flange width to what the part actually needs is one of the few design changes that cuts the unit price without touching quality.
- Cycle time
- Thicker sheet heats more slowly, deeper parts cool more slowly, and both push the machine's time per part up. On a long run this becomes the difference between one machine and two, which is why cycle time belongs in the quotation discussion and not only in the tool shop's head.
- Trimming and secondary work
- Hand trim, CNC trim or a steel die, plus any printing, assembly, insertion or packing. These are the lines a short quotation leaves out, and they come back as a supplement later.
- Volume and setup
- The setup cost of a run is spread across the pieces in it. This is why the same part priced at a thousand pieces and at fifty thousand pieces comes back with two different unit prices that are both correct, and why a supplier's rate is only meaningful next to the quantity it was quoted for.
Comparing two forming quotes is therefore mostly a paperwork exercise. Before you judge the numbers, check that both quotes describe the same sheet and thickness, the same minimum formed wall, the same trim method, the same secondary operations, the same packing, and the same delivery term. Two quotes that agree on all six are genuinely comparable, and a gap between them means something real. Two quotes that differ on any of the six have not been compared at all — and the price difference is usually explained by the difference nobody wrote down. The same discipline applies past the factory gate, because the the landed total on a vacuum forming order, and freight is charged on volume, which formed parts consume generously.
Who Makes Vacuum-Formed Parts, and What a Cheap Quote Leaves Out?
Forming is a common capability, which makes it easy to find a supplier and harder to find the right one. Most workshops that quote you can form a sheet. Far fewer can tell you which sheet they formed, what the wall measures at the deepest point, or what class of mould they built. Those three answers are the difference between a supplier and a broker, and they are cheap to ask for before any money moves.
A cheap quotation is not dishonest by definition. It is usually a quotation for a smaller scope than you assumed, and there are five places the scope shrinks:
- A thinner sheet. A cheaper quote can be the right part formed from a cheaper grade or a thinner sheet, which is invisible until the part is loaded or dropped. Ask for the sheet's thickness and grade in writing, then check the formed wall on the sample.
- A sample-class mould used for production. This is the most expensive saving in the whole process, because the parts never match the sample and the fix arrives after the customer does. Ask which class of mould the production price is built on, and whether the sample you are approving comes from that same class.
- Trim and secondary work excluded. A price for "formed parts" that does not name the trim method is a price for sheets with parts still attached to them.
- No packing. Formed parts are bulky and do not nest tightly once they are rigid, so the pack is a real cost. A quote that says "bulk packed" has answered the question badly, not avoided it.
- No document with the goods. For food-contact or electronic parts, the paper that proves what the sheet is made from has to travel with the shipment. A quote that cannot name the document is a quote you will have to chase after the goods have sailed.
Two checks make the whole comparison cheaper. First, confirm who you are actually talking to, because a workshop and a reseller answer technical questions very differently when you ask for the mould drawing — the method is the same one described in telling the two apart. Second, inspect the first run against a stated plan rather than against a feeling, using a written how many vacuum forming units to pull per batch so that "acceptable" means the same thing to both sides. Neither check costs anything and both change the questions you ask.
What Are the Common Failures?
Forming failures are unusually easy to diagnose, because each one has a signature and each one comes from a decision made before the machine started. Five cover almost everything buyers meet.
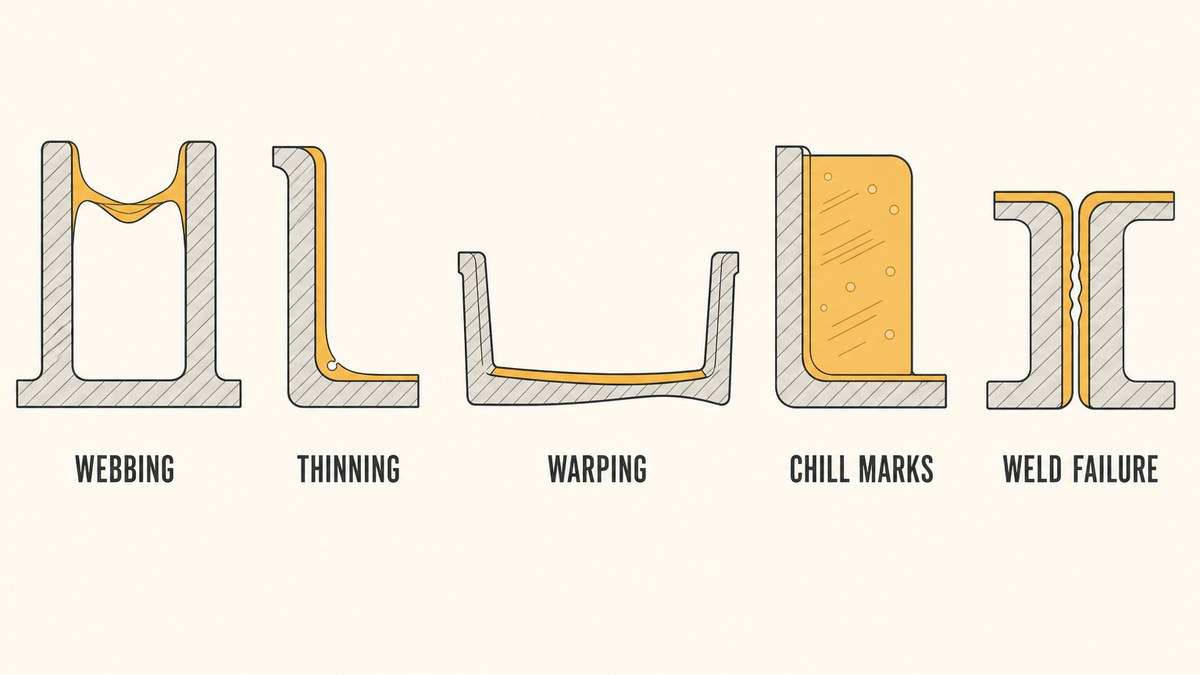
- Webbing and folds
- Where the sheet has to feed from two directions at once — the gap between two tall features — the surplus material has nowhere to go and folds into a web. It is a drawing problem, not a machine problem: more space between the tall features, or a gentler height, removes it. A supplier who answers webbing with a slower cycle will not remove it.
- Thinning and pinholes
- The deepest, tightest corner always takes the worst of the stretch, and if the draw ratio is too high for the sheet, the wall there goes thin enough to see light through. This is why the minimum formed wall belongs on the drawing. A pinhole in a food tray or a sealed part is not a cosmetic defect, it is a leak.
- Warping and bowing
- A formed part comes off the machine hot, and if it is pulled before it has cooled evenly it will move, usually as a bow across the base or a twist along its length. Cooling time is the fix and it is a machine-time cost, which is why it is the first thing shortened when a shop is under pressure.
- Chill marks and surface drag
- Where the sheet touches a cold mould before it has finished stretching, it leaves a mark or drags across the surface. It is a temperature problem, and on a visible face it is a reject. It also tells you something useful: a shop that cannot control sheet temperature will not hold a fine texture either.
- A failed weld
- On twin-sheet parts the joint between the two formed sheets is a structural weld, and when it is too narrow or made at the wrong temperature it opens under load. Because the weld is inside the part, it fails late and it fails as a leak or a split rather than as a visible defect. If your part is twin sheet, the weld width belongs in the specification and on the inspection sheet.
All five share one lesson: the failure is usually decided before the first part is formed, and it shows up after the parts have shipped. That is the argument for spending the time on the drawing, the sheet spec and the mould class rather than on the last few per cent of the unit price.
Frequently Asked Questions
How do I know whether my part should be vacuum formed or injection moulded?
Ask whether the wall has to be exact and whether the volume can pay for a steel tool. Vacuum forming wins on shallow parts, loose wall tolerance and low volume, because the mould is cheap and the first sample is fast. Injection moulding wins as soon as the wall has to be precise, the part has to carry a real load through ribs and bosses, or the volume is high enough to pay back the tool. A useful test is to price the part both ways at your actual quantity, then ask which quote depends on a guess about future volume.
What is a draw ratio, and what ratio is too deep?
The draw ratio is the depth of the formed part divided by its narrowest width. As it rises, the sheet has to stretch further and the wall at the deepest point gets thinner. There is no single number that is too deep, because the answer depends on the sheet, the starting thickness and how the corners are shaped — but the shallower the part and the rounder the corners, the more even the wall. If a supplier cannot tell you what the wall will measure at the worst point, the ratio has not been checked.
Why were my samples perfect but the production parts different?
The usual cause is that the sample came from a sample-class mould and production runs on a production mould, and the two do not form identically. The sample proved the shape; it did not prove the surface, the draft or the consistency. Ask which class of mould the sample was made on and which class the production price is built on. If the two differ, pay for a sample off the production mould before you approve the run.
Which sheet should I use for a food-contact part?
Start from the market you are selling into, because the permitted materials are listed rather than recommended. In the United States the olefin family is covered by 21 CFR 177.1520, and in the European Union plastic food contact materials are governed by Regulation (EU) No 10/2011. Whatever the market, ask for the sheet's polymer and grade in writing, and for the document that shows it. Remember that printing inks, adhesives and coatings on the finished part sit inside the same question as the sheet itself.
How long does a forming mould take to make?
A sample-class mould can be turned around in days because it is cut from a soft material. A machined aluminium production mould takes longer, because it has to be cut, have vacuum channels and cooling passages worked into it, and then be tried out. The honest answer is that the mould is rarely the longest wait — sheet availability and the sample approval cycle usually take longer, and both are worth writing into the schedule as separate items.
Can I move my forming mould to another supplier later?
Only if you arranged it first. A forming mould is cheap enough that buyers often let the converter hold it, which quietly removes the option to move production. Write it into the order: who owns the mould, whether it may be moved, in what condition it must be returned, and who pays the freight. The clauses are the same ones used for injection tooling, and they are far easier to agree before the first order than after the third.
Send the drawing, the quantity and the wall you cannot go below
Tell us the part's outside size and depth, what it holds or covers, the thinnest wall you are willing to accept at the worst point, and the quantity you expect in the first order and the reorder. Those four answers settle the route, the sheet, the mould class and the trim before a price means anything. We will come back with the route we recommend and why, the sheet's polymer and grade with the document that proves it, the minimum formed wall we will hold, the tooling class and its ownership clauses, and the trim and packing lines shown separately, in writing, before anything is cut.
Request a Vacuum Forming Sourcing Quote
Questions & Comments
We read every one and reply within 24 hoursIf you are holding a drawing and trying to decide whether it is a formed part at all, post three things and we can usually say: the outside size of the part, how deep it is at its deepest point, and whether the wall has to be exact or only roughly consistent. If you already have a quotation, add the sheet thickness and grade the supplier named, and the trim method, because those two lines explain most of the gap between two forming quotations.