
Pallet Racking Manufacturer: Sourcing Warehouse Racking From China
 ·
Updated October 12, 2026
·
26 min read
Pallet racking looks like the simplest industrial product there is: a frame, some beams, and a price per pallet position. It is not simple, and the reason is that a rack has three different capacities rather than one, that the number on the quotation usually describes only the first of them, and that the rules covering it change completely the moment somebody puts a deck on a level and walks on it. This guide covers the three capacities, the parts that carry the load, the rules on tiered storage and on floors and their edges, how much of your building the rack eats, what corrosion and a bent upright actually mean, and the lines to put on an order so that what arrives is what you thought you bought.
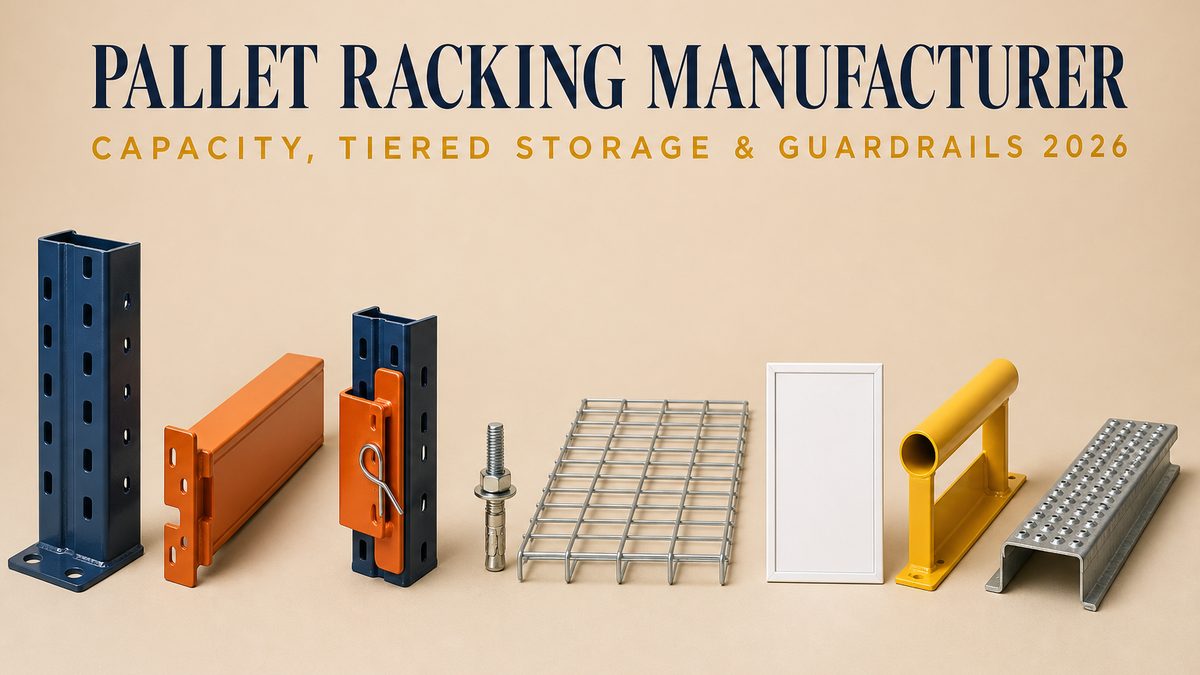
Six Lines That Decide Whether a Racking Quote Is Complete
| What the buyer has to settle | Why it is not obvious | The line on your order that closes it |
|---|---|---|
| Which capacity figure applies | A rack has a beam capacity, an upright capacity and a floor capacity, and they are three different numbers | All three, each with the load position and the number of levels it assumes |
| Whether the rules treat it as storage or as a floor | A plain rack is tiered storage; add a decked level that people walk on and the rules for floors and edges arrive with it | Whether a walkable level exists, and if so its guardrail and its toe board |
| What carries the load at each beam level | The beam-to-upright connector and its safety clip take the load out of the beam and into the frame | The connector type, and confirmation that a clip is fitted at every connection |
| What the rack is fixed to | An unanchored rack stands on its own weight, and the base plate is where corrosion does its quiet damage | The anchor specification, the slab thickness and the floor flatness |
| How much floor the rack actually leaves you | Aisle width is set by how the truck turns, not by how wide the rack is | The aisle width at the turn, drawn on a layout before you order |
| Who decides a damaged rack is still safe | The rule puts any repair touching the structure in the hands of a qualified person | An inspection routine, a damage tag, and a named qualified person |
What a Pallet Racking System Is, and the Four Figures That Decide It
A pallet racking system is a steel structure made of vertical frames connected by horizontal beams, and it exists to hold loads above the floor so that the floor can be used for movement rather than for storage. Every system in the world is a variation of that idea, and four figures describe any one of them.
- Frame height and width
- The frame is the vertical part, built from two uprights joined by bracing. Its height sets the top level you can reach, and its width sets how many pallet positions fit side by side in a bay.
- Beam length and the number of levels
- Beam length is the clear span between two frames, measured from inside face to inside face. The number of levels decides how many pallet positions the rack gives you and, as the next section shows, how hard each upright has to work.
- Frame depth
- How far the frame reaches front to back. It has to be at least as deep as the pallet you are storing, and it is usually a little deeper so that the pallet does not overhang the beam.
- Capacity
- The load the structure will carry. It is not one number, and treating it as one number is the most common and most expensive mistake in this product.
The parts that make those figures real are few, and they are worth learning by name because every later question runs through them. The upright is the slotted vertical column; the slots down its face are what make the rack adjustable, and they are also where the capacity is transferred out of the beam. The beam is the horizontal member, and at each end it carries a connector — usually a plate with hooks or studs that drops into the upright slots. A safety clip, a small spring steel piece, snaps over the connector once it is seated, and its entire job is to stop the beam lifting out of the slots if something knocks it from below.
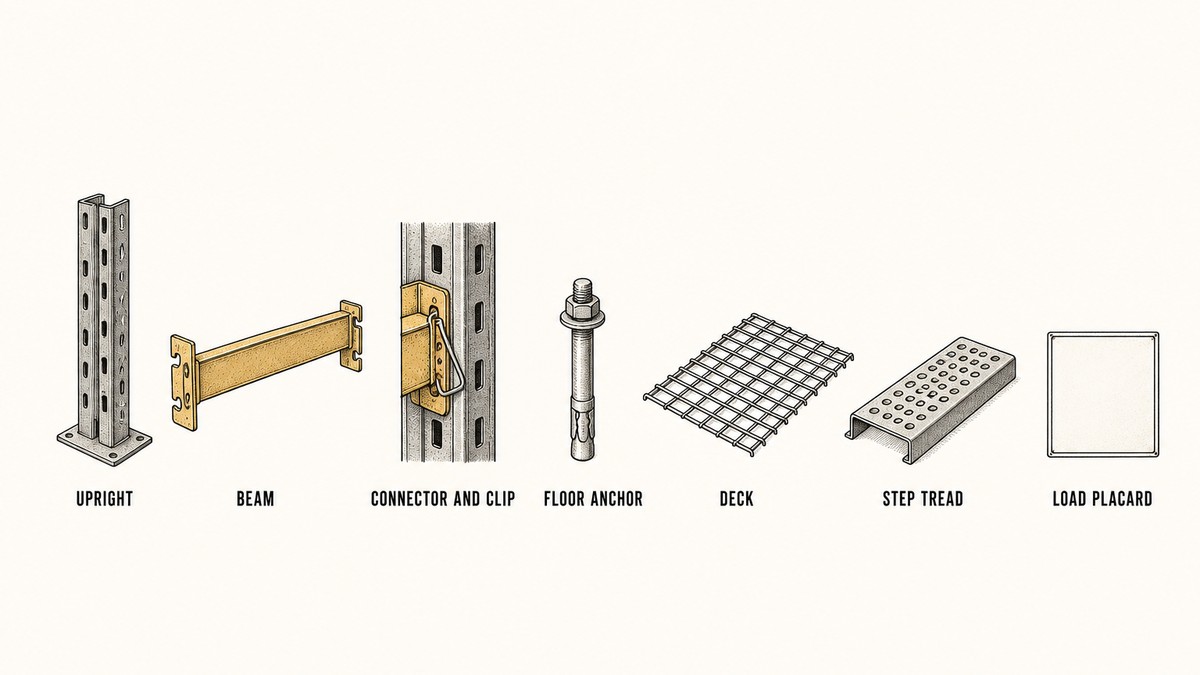
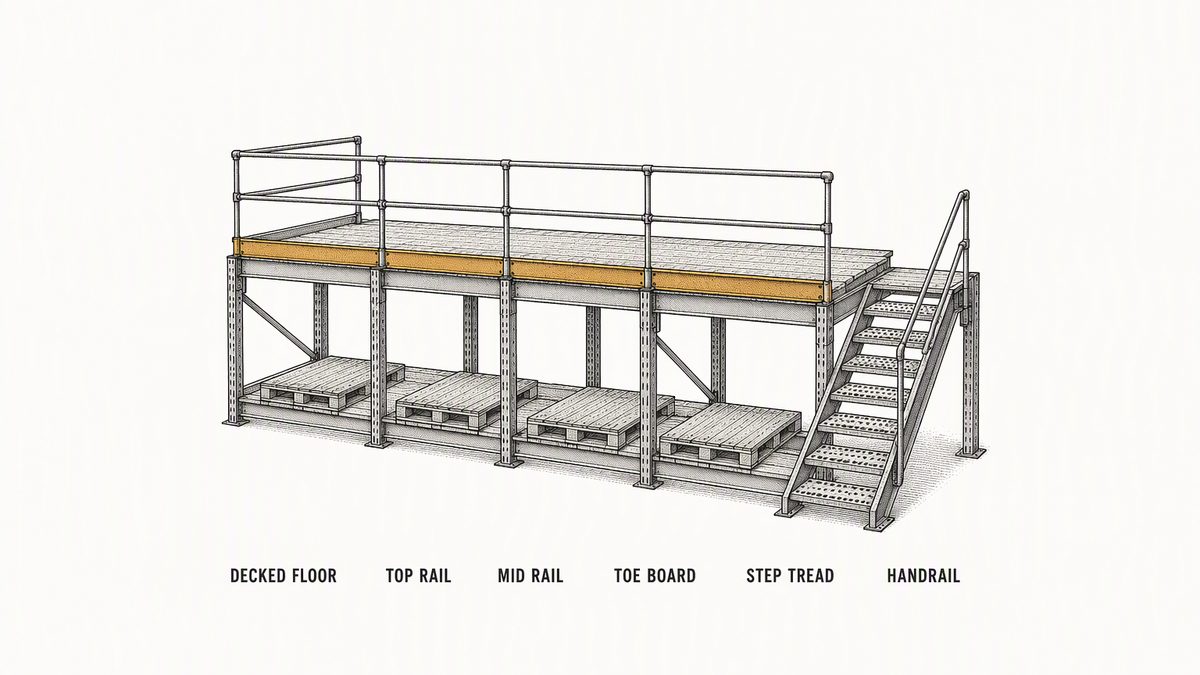
Below the upright sits the base plate, welded to the foot of the column, and through it the rack is meant to be anchored to the floor. Then there are the parts that turn a rack into something more than a shelf: decking, which is the mesh panel or steel panel laid on the beams to give a surface; guardrails and toe boards, which appear once people walk on a level; and the load placard, the small sign that is supposed to tell anyone standing in front of the rack what it will carry.
One habit separates buyers who get what they wanted from buyers who get a delivery. Almost every dispute on this product comes down to a figure that was never written down, and the figures that go missing are always the same four: the load per beam level, the load per upright, the position of the load on the beam, and the number of levels the capacity assumes. A factory is not being dishonest when it quotes a single capacity; it is quoting the number that wins the order, which is the highest one it can defend. Writing the other three into the enquiry costs nothing and changes the price before the steel is cut rather than after.
Capacity Is Three Numbers, Not One
Here is the sentence worth taking from this whole article: a pallet rack does not have a capacity. It has a beam capacity, an upright capacity and a floor capacity, and the lowest of the three is the one that matters.
Follow the load. A pallet sits on a pair of beams. The beams carry it across the clear span between two frames, and they have a limit that depends on the span, on the beam section and on where on the beam the load sits. At each end the beam hands its share into an upright, through the connector. The upright then carries the sum of every level above it — and this is the part buyers miss — because the upright near the floor is carrying not just the load of the level next to it but the accumulated load of every beam level in that frame. Finally the upright passes the whole thing down through its base plate into the floor slab, and the slab has a limit too.
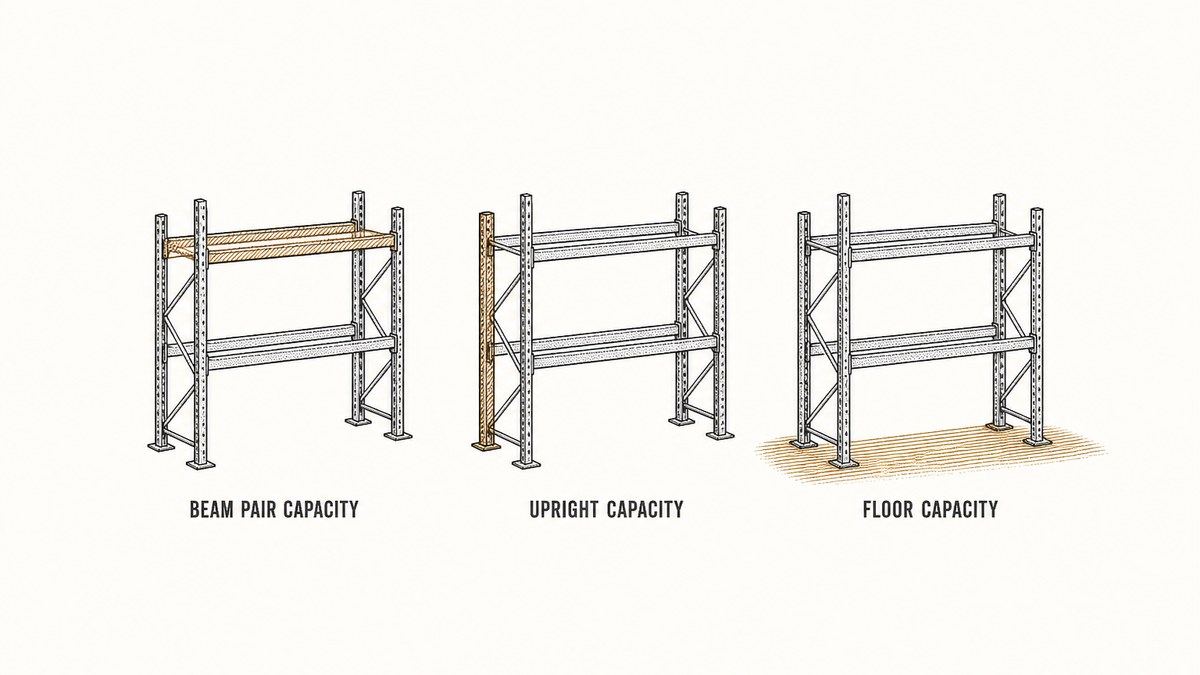
Three consequences follow, and each one has cost somebody money.
The beam figure belongs to a pair, evenly loaded. A capacity quoted for a beam level normally assumes two beams carrying a uniformly spread load between them, with the load sitting inside the beam span rather than hanging off the end. Put a single heavy item in the middle of a bay and you have changed the distribution. Let a pallet overhang the end of the beam and you have changed it again. Neither is necessarily unsafe; both mean the quoted figure no longer describes your situation, and the honest way to handle it is to send the factory the actual load, its position and its footprint and ask them to confirm, in writing, the capacity for that arrangement.
The upright figure is cumulative, and it drops as you add levels. A frame that is perfectly capable of carrying one loaded level may be over its limit at six, because the bottom of the upright is carrying everything above it. This is why the same frame appears with different capacities in different catalogues, and why a capacity quoted per upright is meaningless without the number of loaded levels it assumes. When you compare two quotations, compare them at the same number of levels and the same load per level. A quote that looks generous at two levels can be the weakest offer at five.
The floor is part of the structure, and it is the part you do not buy. The uprights concentrate the whole load of the rack into a small number of base plates. A slab that is fine for a forklift can still be tight under a loaded rack, particularly in the middle of a bay where the load path has least support beneath it and around the edges of a mezzanine. If you do not know your slab thickness and its state, find out before you order, because the answer can change the rack layout — more frames at closer centres spreads the same load over more base plates — and it is much cheaper to change a layout than to repair a floor.
Two habits make a capacity conversation productive rather than argumentative. First, always ask for the capacity figures with their assumptions: for the beam pair, the span and the load position; for the upright, the number of loaded levels; for the floor, the load per base plate. Second, ask for the placard figure, which is the number the factory is prepared to see written on a sign in front of the rack. A factory that publishes a placard figure has committed to something a customer will compare against reality, and that is a different kind of answer from a catalogue maximum.
The Rule That Names Tiered Storage
Pallet racking is a product where the rules are thin, specific and unusually worth reading, because the first of them describes the product almost word for word.
In the United States, storage of material is covered by 29 CFR 1910.176. The paragraph on storage reads:
“Storage of material shall not create a hazard. Bags, containers, bundles, etc., stored in tiers shall be stacked, blocked, interlocked and limited in height so that they are stable and secure against sliding or collapse.”
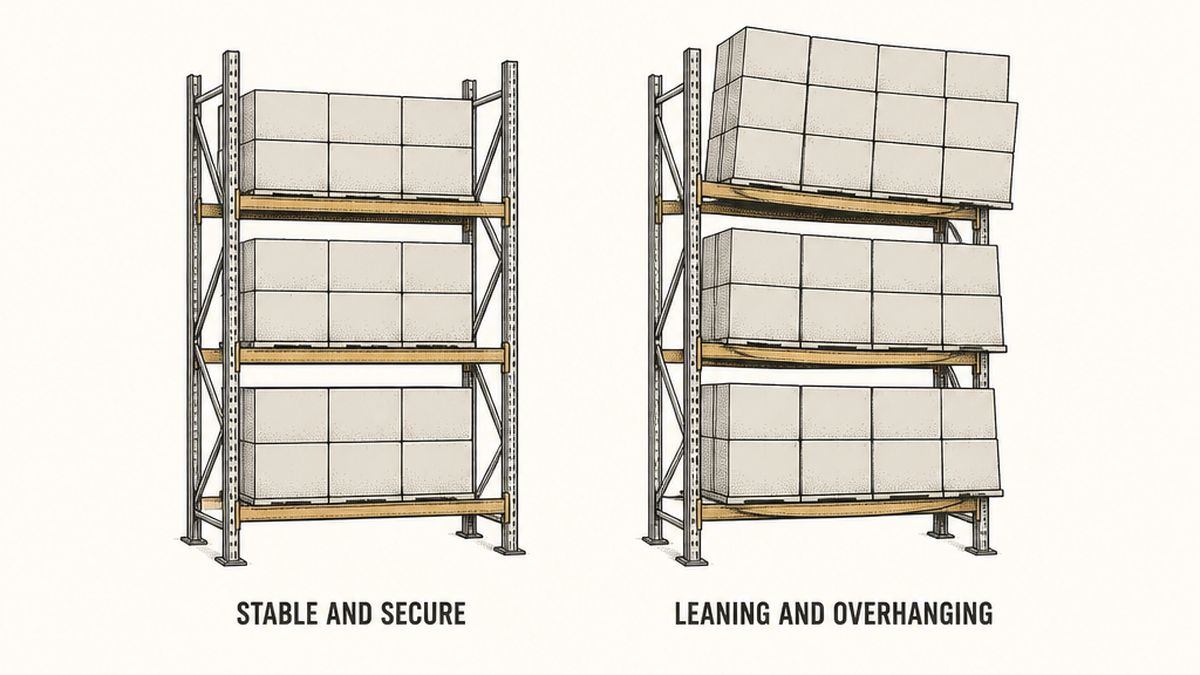
Read the second sentence as a description of a rack. Material “stored in tiers” is what a pallet rack does by definition. The requirement is that tiered storage be stable and secure against sliding or collapse, and the words that do the work are limited in height. A rack is not automatically safe because it is a rack; it is safe when the way it is loaded keeps it stable. That gives a buyer three subjects to take seriously, and all three are visible from the floor.
Height. The number of loaded levels the rack was designed for is a structural fact, not a matter of how much stock arrives in a busy week. A level that was designed for one pallet per position and is loaded two high, or a top level loaded where the capacity assumed it empty, changes the load the uprights carry. The rule does not give a height; it makes the height the operator's responsibility, which is exactly why the load placard belongs on the frame where somebody will see it.
Stability, and the way pallets sit. A rack is stable when loads sit squarely over the beams, inside the beam span and within the footprint the rack was designed for. It becomes unstable when pallets overhang, when a damaged or non-standard pallet is used, when a load is placed so that it leans, or when the gap between the top of a stack and the beam above is closed so that a lift truck has to push the load into place. Every one of those is a handling habit rather than a product fault, and every one of them is exactly what “stable and secure against sliding or collapse” is aimed at.
The space around it. The same section requires that where mechanical handling equipment is used, enough safe clearance be allowed for aisles, at loading docks, through doorways and wherever turns or passage must be made. On a rack installation that is not a footnote; it is half the design. A rack that fills a building wall to wall with aisles sized for the truck the buyer already owns is a rack that will be struck, and struck racking is where most rack damage begins.
There is one more line in 1910.176 worth knowing, because it catches people who build upward. The rule requires that covers or guardrails be provided to protect personnel from the hazards of open pits, tanks, vats and ditches. That is not about racking, and it is worth reading anyway, because it is the same instinct that the next two sections apply to a different edge: a change in level that a person can fall from, or into, needs something physical in the way.
When a Rack Becomes a Floor
The single most important thing to understand about racking rules is that they change character the moment a level stops being a shelf and becomes something a person walks on.
Load a rack with pallets and you are doing tiered storage, covered by the storage rule in 1910.176. Add a deck to a level, put a stair up to it and let people work on it, and you have built a raised floor. From that moment the rack is a walking-working surface, and a different and much more detailed set of rules applies to it. This is the fork in the road that decides which paragraphs of the rulebook your order has to satisfy, and it is decided by the buyer's layout, not by the supplier's product.
The rules for walking-working surfaces begin with 29 CFR 1910.22, and the paragraph that matters most to a rack-supported platform is short: the employer must ensure that each walking-working surface can support the maximum intended load for that surface. There is no formula in the rule and no table of figures. The rule places the duty on the person who owns the floor and leaves the arithmetic to the people who design it, which is precisely why the design load for a mezzanine deck has to be a written number on the drawing rather than an assumption that a deck laid on a rack is as strong as the rack beneath it.
Two neighbouring paragraphs in the same section matter just as much once steel is standing in a working building. The first requires that walking-working surfaces be kept free of hazards such as sharp or protruding objects, loose boards, corrosion, leaks, spills, snow and ice. Corrosion appears on that list by name, and a rack in a cold store, a food plant or a building with a leaky roof is exactly where it appears in practice. The second requires that walking-working surfaces be watched over: inspected regularly and as needed, kept in a safe condition, with hazardous conditions corrected or repaired before anyone uses the surface again, and with this important addition — when a correction or repair involves the structural integrity of the walking-working surface, a qualified person performs or supervises it.
That last requirement is the one to take to a supplier. It creates a role. Somebody has to be the qualified person for your racking, and on a rack-supported mezzanine the deck, the beams and the uprights are all part of the structural integrity of a floor. If nobody in your business owns that role, then a bent upright will be dealt with by whoever notices it, which in practice means it will be dealt with by nobody or by the person with the biggest hammer.
Adding a walkable level brings three more things with it, and they are all parts you can buy rather than habits you have to teach. A raised floor has an open edge, and an open edge above a working area is a fall hazard. It has stuff that can be dropped from it, which is a hazard to whoever is underneath. And it needs a way up, which is a stair or a ladder and therefore a third set of rules again. The next two sections take those in turn, because they are where the specific numbers live, and the specific numbers are what a buyer can put on an order.
Guardrails, Toe Boards and the Numbers Attached to Them
If you take one section of the racking rulebook to your supplier, take this one. It is where the numbers are.
The duty to protect against falling comes first. Under 29 CFR 1910.28, an employee on a walking-working surface with an unprotected side or edge that is 4 feet (1.2 metres) or more above a lower level must be protected from falling, and the rule names the ways that can be done: a guardrail system, a safety net system, or a personal fall protection system. Four feet is low. A mezzanine deck at the top of a two-level rack is well past it, and so is the second level of a rack that a person stands on to pick.
Because a guardrail system is the usual answer on racking, the criteria for one matter. Under 29 CFR 1910.29, the top edge height of top rails is 42 inches (107 centimetres), plus or minus 3 inches, measured above the walking-working surface. Read that carefully: it is not a minimum with unlimited headroom, it is a band. A rail at 38 inches is out of the band. A rail at 47 inches is out of the band. And a rail at the right height that was set before the deck was finally levelled can move out of the band afterwards, which is why the height is worth measuring on site rather than trusting to a drawing.
The same section deals with what goes below the top rail and with the gap at the floor, and this is the part suppliers most often get wrong because it is the part that looks like a detail. Where a guardrail system is used, screens or mesh, when used, must extend from the walking-working surface up to the top rail and along the whole opening between the top rail supports. And where there is a risk of things falling from the surface onto people below, the rule calls for protection from falling objects, which in practice on a mezzanine means a toe board. The criteria for a toe board are unusually specific, and every one of them is a specification rather than an opinion:
- Height
- A toe board must be 3.5 inches (9 centimetres), measured from the top edge of the toe board down to the level of the walking-working surface. That is the number to write on the order, and it is the number to measure on arrival.
- The gap above the surface
- There must be no more than a 0.25-inch (0.5-centimetre) clearance or opening above the walking-working surface. This is the requirement people find surprising, because the natural instinct is to lift the toe board slightly so that a wash-down or a broom can pass under it. The rule exists because that gap is exactly where a dropped bolt or a small part rolls through.
- Openings in the board itself
- A toe board must be solid, or have no opening that exceeds 1 inch (3 centimetres) at its greatest dimension. This is why a length of mesh or an expanded metal offcut, which looks tidy and is cheap, is often the wrong material for a toe board: the product of the mesh is its openness.
- A shorter board for a specific use
- Around vehicle repair, service or assembly pits the minimum height drops to 2.5 inches (6 centimetres), and toe boards may be left out entirely where a toe board would itself create a hazard. This one exists because a board at a pit has to be stepped over by people working at ground level, and the rule trades a little protection against falling objects for a trip hazard. It has no application to a mezzanine, and it is worth knowing only so that nobody quotes it at you.
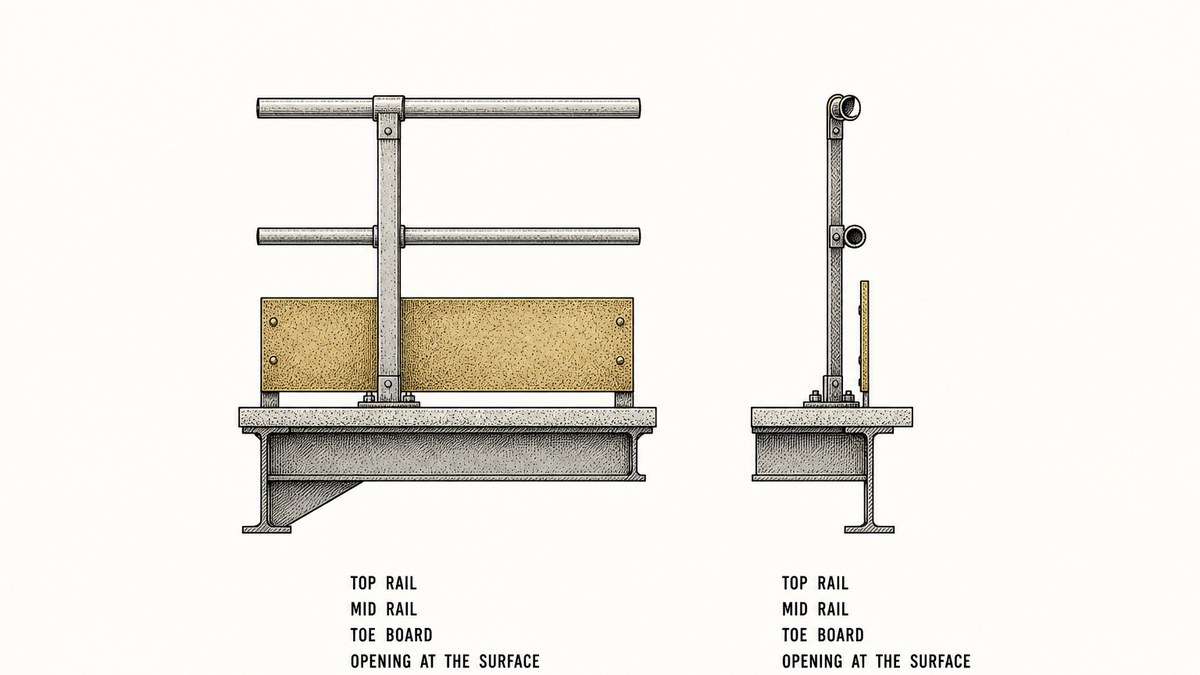
Put those together and a complete guardrail specification for a mezzanine is short enough to put in a single paragraph on an order: a top rail 42 inches above the deck within three inches either way, a mid rail or a mesh screen filling the opening down to the deck surface, and a solid toe board 3.5 inches high with no more than a quarter of an inch of gap where it meets the deck and no opening in the board bigger than an inch. A supplier who recognises those figures and can confirm them on a drawing has the product. A supplier who asks what you mean has a catalogue.
Uprights, Beams, Connectors and the Clip
The frame and the beam get the attention. The connector and the clip are where the strength is transferred, and they are the two parts that decide whether the rack behaves as the capacity table says.
Uprights. An upright is a roll-formed steel column with a perforated face. The perforations are the adjustment system, and their shape is the interface with every beam you will ever fit. Two things matter. The first is the steel: how thick the section is, and what grade. The second, and the one buyers rarely ask, is which way the upright is oriented in the frame and how it is braced. A frame is a pair of uprights joined by horizontal and diagonal bracing, and the bracing is doing real structural work — it is what stops the frame from collapsing sideways and what gives the whole rack its resistance to being pushed from the front. A frame with lighter bracing is not a lighter version of the same product; it is a different structure with a different capacity, and it is often where a cheap quotation has saved money.
Beams. A beam is usually a pair of roll-formed profiles welded or riveted back to back into a box or a step section, and its capacity depends on the section, on the clear span between frames and on where the load sits. Two things follow. First, beam capacity is very sensitive to span, so a beam figure is meaningless without the span it applies to; a beam quoted at a longer span than your layout has may be perfectly adequate, and the same beam quoted at a shorter span may be much stronger than the table suggests. Second, the load has to sit on the beam, not hang off the end of it and not overhang the frame.
The connector, and why it is the real subject. At each end of a beam there is a plate with hooks or studs that engages the upright slots. This joint is where the entire load of the beam level leaves the beam and enters the frame, and it is a connection, not a weld: it is designed to be assembled by hand and taken apart again. That has three practical consequences worth knowing before you buy.
The first is that the connector is the part that defines the interface between your beams and your frames. If you later want to buy beams from a second supplier, or add a level from a different factory, the connector has to match the upright slot pattern and the load rating of the joint. Racking from two sources sharing one installation is something buyers do all the time, and it is safe when the joint is compatible and unwise when nobody checked.
The second is that connectors differ in design, and some designs are more forgiving of movement than others. A connector with several hooks distributes the load over more of the upright face; one with a single stud concentrates it. This is a legitimate difference between makers rather than a trick, and it is a reasonable question for a supplier.
The third is the piece that looks like an accessory and is not. The safety clip snaps over the connector after the beam is seated, and its job is to keep the beam from being lifted out of the slots. Beams get knocked from below all the time — by a lift truck fork, by a pallet being pushed into place, by a load being dragged. Without the clip, a beam that has been lifted off its hooks can drop at the moment of loading. The clip costs almost nothing, it is easy to forget to refit after an adjustment, and it is the first thing an inspector looks for. Write it into the order as a clip fitted at every connection, and check on arrival that every connection has one.
Access: Ladders, Stairs and the Way People Get Up There
The moment a rack has a level that people use rather than load, it needs a way up, and that way becomes a product in its own right with its own rules.
The two candidates are a ladder and a stair, and the choice is not stylistic. A ladder takes far less floor space, is cheaper, and is the right answer for occasional access to a level used for stock rather than for work. A stair takes much more space, costs several times as much, and is the right answer wherever people will be carrying things up and down, working on the level for a shift, or moving stock continuously. Makers of rack-supported mezzanines will happily supply either, and the layout consequences of choosing the stair at the design stage are much smaller than the consequences of adding one later.
Both have rules attached, and both come down to numbers that a supplier can be asked to confirm. A fixed industrial stair has requirements about the angle, the width, the tread and the nosings, and one of them is a direct product question for a racking supplier: stair treads have to be reasonably slip-resistant and the nosings must be of non-slip finish. That is why a formed steel tread with a perforated or serrated surface exists, and it is why a plain steel tread is not an acceptable substitute no matter how the price looks. On a rack installation this is the part of the product a buyer is most likely to see downgraded in a quotation, because a plain tread and a slip-resistant tread look identical on a small drawing and cost differently.
Ladders bring their own set of numbers, covering the angle of a fixed ladder, the rungs and their spacing, and the requirement to extend above the landing rather than stopping level with it. The point for a buyer is not to memorise those figures — it is that a ladder supplied with a rack is a product with its own rules questions, and it should arrive with the same documentation as the rack rather than being treated as an accessory. If the factory is buying ladders in from a third party, ask who makes them. It is a better question than it sounds, because the answer tells you whether the factory has thought about the ladder at all.
Two practical details complete the access picture, and both are decided by the layout. The first is where the access lands: a stair or a ladder should not discharge into an aisle where a lift truck is turning, and on a small mezzanine the only place it fits is often exactly there. The second is what happens underneath the access. A stair rising from the floor of a warehouse occupies floor space that could otherwise hold a pallet position, and it also creates a space beneath it that will be used for storage unless it is closed off, which is worth deciding deliberately rather than discovering later.
Aisles, Clearances and the Space You Did Not Buy
A rack is the thing you buy. The aisle is the thing that decides how much rack you can have, and it is the most expensive floor in the building because it holds nothing.
The rule on clearances is short. It requires that where mechanical handling equipment is used, enough safe clearance be allowed for aisles, at loading docks, through doorways and wherever turns or passage must be made. There is no number in it, and that is deliberate: the number depends on the truck, the load and the driver, not on the rack. So the aisle is worked out from the equipment, and the sequence is always the same. You choose the truck, you find out what aisle it needs to work safely, and the rack layout is built around that figure. Buyers who do it the other way — buy the rack to fill the floor and then discover what the truck needs — are the buyers who end up with a damaged installation.
The reason an aisle needs more room at a turn than in a straight run is worth seeing once and then never forgetting. A lift truck turning out of a rack aisle swings its rear end in the opposite direction to the front. At the moment of the turn the vehicle occupies a wider band than its own width, and the part of it that comes closest to the rack is the back corner, which the driver cannot see. That is why the clearance figure for a turn is not the same as the clearance figure for a straight run, and it is why the first damage on a new rack usually appears at the end of a row.
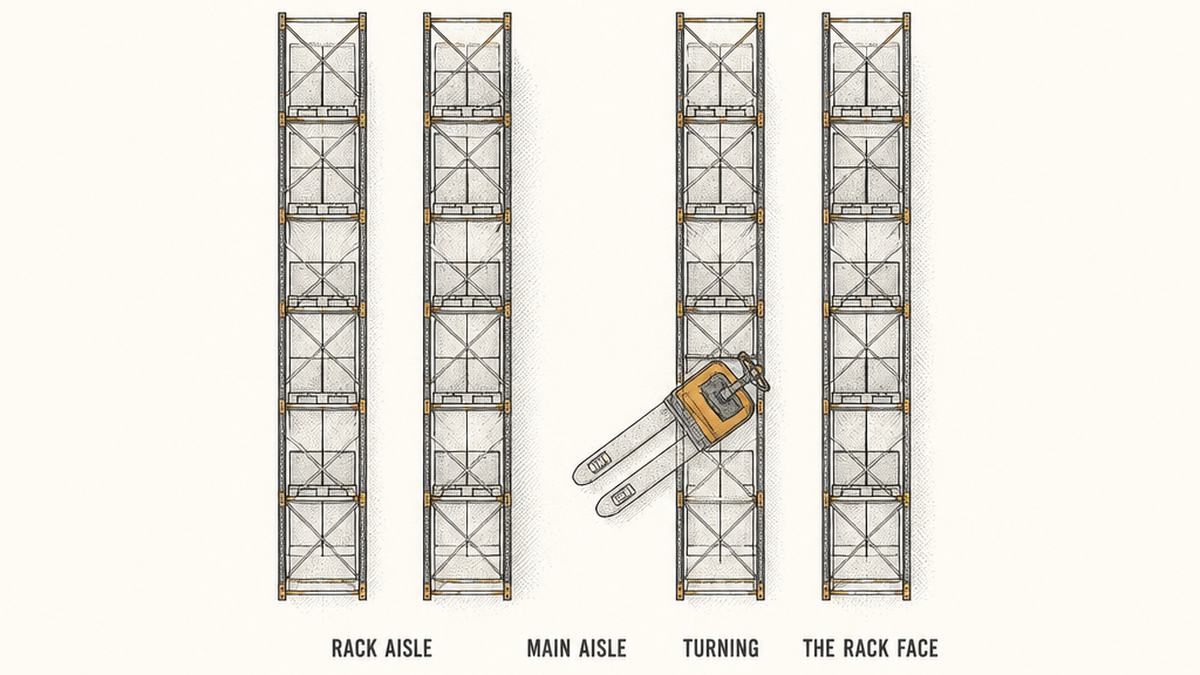
Aisle width is also the lever that decides how high you can afford to go, and this is where the layout conversation becomes a commercial one. A narrower aisle means more rack rows on the same floor, which means more pallet positions per square metre, which is the figure that actually decides whether a warehouse project pays. But a narrower aisle needs a different truck — one designed to work in it, usually with a mast that turns, a reach mechanism, or a cab that rises with the operator. So the honest version of the question is not “how narrow can the aisle be” but “what is the total cost of the truck and the layout that gives me the most pallet positions”. Buyers who compare rack prices alone are comparing the cheapest part of the decision.
Whatever width the layout settles on, three protective products belong in the same order rather than in a later one, because retrofitting them means empty racking and lost time. Column protectors clip around the bottom of an upright in the busiest positions and take the impact that would otherwise bend it. Rack end guards stand at the end of a row and stop a truck that misjudges a turn before it reaches the frame. Bollards or guide rails at the aisle ends and around corners keep the whole vehicle path away from the rack faces. None of these are expensive relative to the rack, all of them are visible on a layout, and a supplier who offers them before you ask has seen a damaged installation before.
One clearance that buyers forget is the one overhead. A rack near a loading dock door, under a low roof, or beneath a sprinkler system has a vertical limit as well as a horizontal one, and the limit that applies is the one that keeps the top of the highest load clear of whatever is above it. Fire protection is its own subject with its own standards, which are published for sale rather than free, so this article does not attempt to summarise them. What a buyer can do without any standard at all is measure: the height from the floor to the nearest obstruction, the height of the tallest load you intend to store, and the clearance between them. If that gap is not comfortable, the answer is a shorter frame, and it is much better to discover it on a drawing than in a building.
Installation, Anchors and the Floor Beneath
The rack arrives as a pile of steel and becomes a structure in a day. The difference between a good installation and a poor one is mostly invisible once it is done, which is why it belongs in the order rather than in a separate conversation afterwards.
The first subject is the anchor. Every upright has a base plate with holes in it, and those holes exist so that the rack can be fixed to the floor. An unanchored rack resists an impact with nothing but its own weight and the friction of its base plates, and a load that would dent a fixed frame can move an unfixed one. Fitting the anchors is the last task of an installation and, on a rushed job, the first task to be skipped; it is also the only part of the work that cannot be seen from the aisle once the rack is loaded. Three things are therefore worth writing down. The anchor specification, so that the correct product is used rather than whatever is in the van. The number of bolts per base plate, because a base plate with four holes and two bolts is a frame that is only half fixed. And a check at handover that every base plate has its anchors, which takes ten minutes with a torch and a list.
Where the ground moves, the anchoring requirement goes further than keeping a rack in place under impact; it becomes part of the design of the structure, and the local rules that apply are site-specific. That is a conversation for a structural engineer working on your building, not for a sourcing article, and it is worth having early because it can change the frame, the bracing and the base plates. A factory that exports to a known seismic region will ask you which rules apply, and a factory that has never been asked may be selling you a product designed for a static building.
The second subject is the floor itself, and it has three separate problems.
- What it is made of, and how thick
- The uprights pass the total load of the rack down through a small number of base plates. A slab that is generous for a forklift can be tight under a loaded frame, and the answer is not necessarily a heavier rack — it may be more frames at closer centres, which spreads the same load over more base plates. Find out the slab thickness before you order, not after.
- Whether it is level
- A long row of rack frames standing on a floor with a fall to a drain, or across a joint that has lifted, will have frames that are not plumb, and a frame that is not plumb loses capacity. The normal remedy is steel shim packs under the base plates, fitted during installation. Two things then need watching: shims must be the right size and properly packed rather than a stack of loose plates, and the anchors have to be long enough to go through the shim and still develop their strength in the concrete.
- What is underneath it
- Trenches, ducts, basements and service voids are the reason a rack layout sometimes cannot go where the drawing says. A base plate over a shallow-buried duct is a load with nothing to carry it. This is a fifteen-minute question with the building's own drawings, and it is usually answered by shifting a row rather than by reinforcing anything.
Two more installation points belong on the list because they are decided once and then live with the building. The first is the height of the lowest beam level, which is set by the clearance needed by the truck and by the tallest load you will take in and out. Setting that level too low is one of the most common complaints on a new rack, and it is caused by ordering from a catalogue line rather than from a layout. The second is lighting and access. An aisle that is dark at the far end will be driven faster than one that is lit, and a rack row with its back against a wall will be loaded from one side only, which changes how the load arrives on the uprights. Neither is a rack problem. Both become rack damage.
Inspection, Damage and the Qualified Person
A rack degrades in a way that is easy to see and easy to ignore, and the rules on it are more specific than most buyers expect.
Recall the two sentences from 1910.22 earlier in this article. Walking-working surfaces must be inspected regularly and as necessary and kept in a safe condition; hazardous conditions must be corrected or repaired before an employee uses the surface again; and where a correction or repair involves the structural integrity of the surface, a qualified person performs or supervises the work. Apply that to a rack and three duties appear that have nothing to do with buying steel and everything to do with it staying safe: somebody has to look on a schedule, something has to happen when the look finds a problem, and somebody has to be qualified to decide whether a damaged member can stay.
What the look is looking for is a short and learnable list, and every item on it is visible from the aisle without taking anything apart:
- Bent or kinked uprights
- The most serious damage on a rack. An upright is a column, and a column that has been bent has lost the property that made it a column. Damage at the base, just above the base plate, is the classic lift truck strike and is the one to look for first in the positions next to an aisle end.
- Cracked welds at the connector
- A fine crack where the connector plate is welded to the beam end, or in the frame's own welded joints. Look for rust staining around a joint, because a crack holds water.
- Missing or displaced safety clips
- Clips come off when beams are moved and are rarely refitted, because the beam goes back in and looks fine. A row of beams with exposed hooks is a warning that the last adjustment was not finished.
- Corroded or unanchored base plates
- The base plate sits at floor level, which is where water, wash-down and spillage collect. Flaking rust around a base plate is a structural finding, not a cosmetic one, and it is on the rule's own list of hazards to walking-working surfaces.
- Damage to beams, decks, guardrails and toe boards
- A beam with a bent flange, a deck panel dropped out of its location, a guardrail with a missing mid rail, or a toe board that has been taken off and not put back. These are the items a routine check catches and an inspection after a conversation does not.
The industry has a practice of sorting damage into bands — light damage that is recorded and watched, moderate damage that means the load comes off, and severe damage that means the member is replaced. That practice is useful and every serious operator uses some version of it, but the specific measuring rules behind it come from consensus standards published for sale, and this article does not invent them. What a buyer can do without any standard is agree three things in writing, which cost nothing and cover most of the risk:
First, a routine and a frequency, with a name against it. Second, a physical way to take a damaged section out of service — a tag on the upright, and a rule that nothing is loaded on a tagged section until the qualified person has decided. A rack with a tag on it is a rack somebody has noticed; a rack with a bent upright and no tag is a rack that will be loaded tomorrow. Third, and least comfortable to say out loud, a rule that damaged members are replaced, not repaired. Straightening a bent upright in a workshop press and putting it back into a loaded position is not a repair, because the member has already yielded once and the shop cannot put back what the rolling mill put in. Welding a rack member without knowing its steel grade is a second way to change its properties. Both are common, both look like thrift, and both put the capacity table out of touch with the structure it describes.
One further item is worth keeping, and it is not a rule at all: a record. The installation date, the capacity figures and their assumptions, every change of layout, every beam added or moved, and every damaged member replaced. On a rack that has stood for ten years, the person who ordered it has usually left, the layout has been changed twice, and the only thing standing between a reasonable question and an unanswerable one is whether anybody wrote it down. It is the cheapest document in the whole project and the only one that gets more valuable every year.
Reading a Pallet Racking Supplier's Data Sheet
Most racking quotations give a length of upright, a length of beam, a price per pallet position and a lead time. Ten lines turn that into an order you can hold a supplier to.
- The load, and where it sits
- The weight and footprint of the load you actually store, and how it sits on the beams. Capacity figures assume a load sitting inside the span; say so on the enquiry if yours does not.
- Beam capacity, with its span
- The load a pair of beams will carry across the clear span in your layout. Capacity without a span is not a number anybody can check.
- Upright capacity, with the number of loaded levels
- The load one frame will carry down to the floor, and the number of levels that figure assumes. A capacity per upright with no level count means nothing.
- Load per base plate, and the floor it assumes
- How much reaches the floor under each frame, so that somebody can check it against the slab. This is the figure suppliers least like to be asked for and the one that decides whether the rack suits the building.
- Section and steel grade for both members
- The upright section and thickness, the beam section, and the steel grade. Two products with the same outline can have different steel inside them.
- The connector and the clip
- The connector design, the number of hooks or studs, and written confirmation that a safety clip is fitted at every connection. Ask for the clip to be listed as a line item rather than assumed.
- Finish
- Whether the steel is powder coated or painted, what the surface preparation is, and whether the finish is applied after the members are cut and drilled. On a rack in a damp or food environment the finish claims more of the price and more of the service life.
- Anchors, shims and floor tolerance
- The anchor specification, how many bolts per base plate, whether shim packs are supplied, and the floor flatness the design assumes. Racking is designed to stand on a floor that is reasonably level, and it is worth knowing what the maker expects.
- Accessories and guardrails
- Decking type, column protectors, end guards, guardrail and toe board sections, and the access ladder or stair with its tread type. All of these are cheaper in the first order than in the second.
- The drawings and the placard
- An installation drawing showing frame positions and aisle widths, a capacity table with its assumptions, and the load placard figure the factory is prepared to see posted on the rack.
Send those lines as a written request to two or three factories rather than asking for a price per pallet position, and the replies do the sorting for you. A factory that makes racking will answer the beam span, the upright level count and the load per base plate from its own tables, because those are the numbers it designs with. A trader will answer the frame height and the price and pass the rest to the factory.That is a perfectly good answer when it is given openly, and it is worth knowing which one you have: ask what the roll former is set to and who set it, because that is the question a reseller fumbles.
What Goes Wrong, and What It Looks Like on Arrival
Four faults account for most of the trouble on a racking delivery, and they divide into the ones caused by the journey and the ones decided on the drawing.
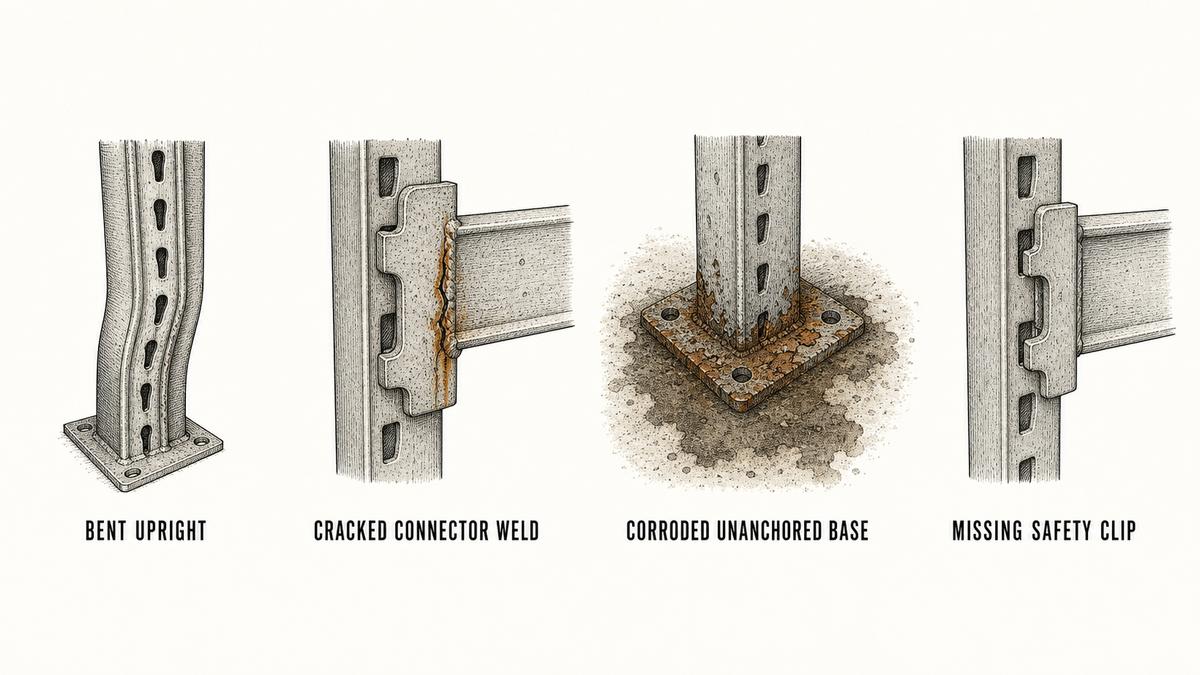
Bent or kinked uprights. A rack frame is a long, light, easily bent assembly travelling as a bundle, and the damage almost always happens at the foot or just above the bracing, where the section is least supported. The check is to stand the frames on a flat surface and look along them from the end, which is the only way to see a bend that is not obvious from the side. Anything kinked at the base, or bent at the point where the bracing meets the upright, should be rejected rather than installed, because a column that has been bent has already lost part of what a column is for.
Cracked connector welds. A fine crack where the connector plate is welded to the beam end. It starts in transit, in a bundle that has been dropped or levered apart, and it is the joint that carries the whole load of the level. Look for rust staining around the weld, which is the easiest way to see a crack that has been there a while, and check every beam end rather than a sample of them.This is also the fault that a first-article check catches before a batch is built, using a dye check on the weld.
Corroded or unanchored base plates. Two faults in one place. Rust around a base plate tells you how the frames were stored before they shipped and how long they sat, and missing or short anchors tell you what happened on site. The base plate is also where the finish matters most, because it lives at floor level where water collects. Ask for a finish that is applied after cutting and drilling, so that the cut faces of the steel are coated rather than left bare, which is where rust starts on a rack that looks otherwise well painted.
Missing safety clips, or clips that do not fit. The clips are shipped in a bag, and the bag goes missing, or the clips are of a pattern that needs a tool to fit and nobody brought one. Clips that do not seat properly are worse than no clips at all, because a seated-looking clip that is not locked gives the appearance of protection without the substance. Count the connections, count the clips, and check that every beam that is loaded has one.
What a visual check on arrival cannot catch is the half of the problem that was decided before the steel was rolled. Nobody can see, by looking at a pile of uprights, whether the frame was designed for the number of levels you intend to load; whether the beam capacity that was quoted applies at your span; whether the load per base plate suits your slab; whether the finish was applied after drilling; or whether a walkable level was in the design at all, which decides whether a guardrail and a toe board should have been in the crate.Those are settled by reading rather than by looking, and on a first order they are worth writing into a written specification and checking against the first delivery before the rest of the batch ships, with the number of uprights to pull set by your batch size.
How the Price Is Built, and How to Check the Supplier Behind It
Racking has ten cost lines and a quotation shows one of them, which is the price per pallet position. Knowing the other nine is what makes two offers comparable instead of merely different.
- The steel
- Section, thickness and grade for uprights and beams, and how much of the total weight is steel. A rack is mostly steel, so this line moves with the market, and a quotation that holds a price for a year is either a very good forecast or a plan to change it.
- Roll forming
- Uprights and beams are roll-formed, not welded from plate, and the tooling and the number of passes decide the accuracy of the profile and therefore how well connectors fit.
- The connector
- Stamped or formed end plates welded to each beam end, with the number of hooks or studs and the quality of that weld. This is where the load leaves the beam, and it is a per-beam cost that a cheap quotation can reduce by making the plate thinner.
- The frame bracing
- Horizontal and diagonal bracing between the two uprights of a frame, plus the welds that join them. Braced frames cost more than lightly braced ones and move far less under a side load.
- The finish
- Surface preparation and either powder coating or painting, and whether it is done after cutting and drilling. The finish is the first line a buyer can see and the easiest one to reduce.
- Base plates and anchors
- Welded base plates, their thickness and their hole pattern, plus whether anchors and shims are included in the price or excluded from it. Excluded anchors are the most common way a racking price is made to look lower.
- Accessories
- Decking, column protectors, end guards, guardrail and toe board sections, and the access ladder or stair. These are a real part of the project and are often quoted separately, which makes the headline figure look better than the invoice.
- Engineering and drawings
- The layout drawing, the capacity table with its assumptions, and the placard figure. A factory that does this work charges for it somewhere; one that does not is expecting the buyer to do it.
- Packing and freight
- Racking is bulky and light, so you are buying cubic metres, and the packing method decides whether the frames arrive straight. Bundling and edge protection are cheap at the factory and expensive to repair on site.
- Installation support
- Whether the supplier provides an installation drawing, supervision, or an installer. On a rack-supported mezzanine this line is where safety is decided, because the structure is only as good as the day it was assembled.
Two of those lines are worth more attention than the rest when comparing offers. The first is the connector, because it is where the load is transferred and it is invisible once the rack is up. The second is whether anchors, shims and accessories are inside or outside the price, because a quotation that excludes them is not cheaper, it is shorter. Put both on the same page as the headline figure before you compare anything.
Minimum order quantity on racking follows freight rather than tooling. Standard frames and beams in standard lengths are made in volume and can be shipped in modest quantities. What drives the order up is a container: racking is bulky and light, so a small order is a poorly filled container and the freight per pallet position punishes the buyer who orders too little. That is a good reason to buy the accessories, the access stair and the guardrails in the same shipment as the rack rather than in a second one.
Then check the party you are talking to, and on this product the questions are unusually revealing. Ask who roll-forms the uprights and beams, because that answer tells you whether the factory owns the tooling or buys finished members. Ask what steel grade it buys and whether it has the mill certificates, because racking is a structural product and the certificates are the only evidence behind the steel. Ask for the capacity table with its assumptions rather than a single capacity — a factory that has one has done the engineering, and a trader cannot produce it. Ask whether the finish is applied after drilling. And ask whether a walkable level was considered in the design, because that answer tells you whether the supplier understood your layout or only your order line.If you have to check certificates for your own records, the issuer's own database is the only place that settles one. For a rack standing beside handling equipment, the same instinct that makes the load figure on a pallet racking applies to a beam capacity: it is only worth anything when the conditions attached to it are written down.
Frequently Asked Questions
How do I work out what capacity I need from a pallet racking system?
Work out three figures rather than one, then take the lowest. The load per beam level is the weight of the pallet and its contents, and you need the capacity for a pair of beams at your span with the load inside the span. The load per upright is the sum of the levels above, so a frame carrying six loaded levels is doing much more work at its base than one carrying two, and the level count has to go with the figure. The load per base plate is what reaches the floor, and it has to be checked against the slab. The rack is only as strong as the weakest of the three, and any supplier who quotes a single capacity without the assumptions behind it has not answered the question.
Does pallet racking have to meet a specific safety standard?
In the United States there is no single product standard inside the free federal rules for a rack as an object. What the rules cover is what a rack does. Storage in tiers is covered by 29 CFR 1910.176, which requires that stored material be stable and secure against sliding or collapse and that enough safe clearance be allowed for aisles and where turns are made. If a level is decked and people walk on it, the walking-working surfaces rules in 29 CFR 1910.22 through 1910.29 apply, including the duty to protect against falls from unprotected edges at four feet or more, the top rail height of 42 inches plus or minus 3 inches, and the toe board criteria. There are also industry consensus standards for rack design and for damage assessment, and those are published for sale rather than free, so this article does not summarise them or quote figures from them.
What is the difference between beam capacity and upright capacity?
They are limits on two different parts of the same load path. Beam capacity is what a pair of beams will carry across the clear span between two frames, with the load spread between them, and it falls as the span gets longer. Upright capacity is what one frame will carry down to the floor, and because a frame carries the sum of every loaded level above it, that figure depends on how many levels are loaded. So the same frame has different capacities in different installations, and a capacity quoted for an upright is meaningless without the number of loaded levels it assumes. When you compare quotations, compare them at the same span, the same load and the same number of levels.
What is a toe board, and why does the gap underneath it matter?
A toe board is a low vertical plate fitted along the open edge of a raised floor to stop things being kicked or knocked off it onto the people below. The rules that apply to a rack-supported mezzanine require it to be 3.5 inches high measured from its top edge down to the walking surface, and to have no more than a quarter of an inch of opening above that surface. The small gap is the requirement people find surprising, and the reason is that a gap large enough for a broom is also large enough for a bolt or a small part to roll through. A toe board must also be solid or have no opening bigger than one inch, which is why a length of mesh or an expanded metal offcut, however neat it looks, is often the wrong material for the job.
Do I need to anchor pallet racking to the floor?
Yes, and it is the part of an installation that is hardest to check afterwards because it is at floor level and usually hidden by pallets. Every upright has a base plate with bolt holes, and an unanchored rack depends on its own weight and on friction to resist being hit. The three things to write down are the anchor specification, the number of bolts per base plate, and a check at handover that every base plate has its anchors. Anchors are also the line most often excluded from a racking quotation to make the headline figure look lower, so check whether they are inside the price. In areas where the ground moves, anchoring becomes part of the structural design and site-specific rules apply, which is a question for a structural engineer rather than for the rack supplier.
How do I check a pallet racking supplier who says they are a manufacturer?
Ask four questions and listen to how specific the answers are. Who roll-forms the uprights and beams, and what tooling do they own? What steel grade is bought, and can they show mill certificates? Can they send the capacity table with the span, the level count and the load position behind each figure? Is the finish applied after the members are cut and drilled? A factory that makes racking answers all four from its own records and can send drawings. A trader answers the frame height and the price and passes the rest to the factory, which is a fine answer when it is given openly. Then ask whether the design allowed for a walkable level, because that tells you whether the supplier read your layout or only your order line.
Send the pallet and the aisle — not just a price per position
Tell us the load you store and where it sits, then the lines that decide whether the rack will hold it: the weight and footprint of the pallet with any overhang, the beam span and the number of loaded levels, the frame height and depth, the beam and upright sections with their steel grade, the connector type with confirmation that a safety clip is fitted at every connection, the ancillary finish and whether it is applied after drilling, the anchor specification with the number of bolts per base plate, the floor slab thickness and flatness, the aisle width at the turn with the truck that has to work in it, and — if anyone will walk on a level — the decking, the guardrail and the toe board, plus the way up. If a rack is already standing and behaving oddly, describe what you can see: an upright that is bent at the base, a weld with rust along it, a base plate with no bolts in it, a beam with its clip missing, or a tilt that nobody can explain. The symptom usually says which line of the specification was decided badly.
Request a Pallet Racking Sourcing Quote
Questions & Comments
We read every one and reply within 24 hoursSourcing pallet racking and getting quotations that only say a price per pallet position? Send the load you store and where it sits, then the lines that decide whether the rack will hold it: the weight and footprint of the pallet with any overhang, the beam span and the number of loaded levels, the frame height and depth, the beam and upright sections with their steel grade, the connector type with confirmation that a safety clip is fitted at every connection, whether the finish is applied after drilling, the anchor specification with the number of bolts per base plate, your floor slab thickness and flatness, the aisle width at the turn with the truck that has to work in it, and — if anyone will walk on a level — the decking, the guardrail and the toe board, plus the way up. If a rack is already standing and behaving oddly, describe what you can see: an upright bent at the base, a weld with rust along it, a base plate with no bolts in it, a beam with its clip missing, or a tilt nobody can explain. The symptom usually says which line of the specification was decided badly.