
Custom Drinkware Manufacturer Sourcing Guide: Tumblers, Insulated Bottles, Lids and Printing
 ·
Updated October 9, 2026
·
25 min read
An insulated tumbler or bottle either holds its vacuum or it does not, and that single step decides whether the product performs, because the steel grade and the powder coat are visible while the vacuum is not. This guide covers what actually sets the price, why the grade of stainless matters less than most buyers think and the gasket matters more, how vacuum insulation can fail without any visible sign, what the food-contact rules require of a drinking vessel and where the duty sits, and how to test a sample so that a batch of five thousand does not turn into a returns problem.
What to Specify, by What You Are Making
| If you are making | Specify this | Because |
|---|---|---|
| A vacuum-insulated tumbler or bottle | Steel grade, wall construction, and a thermal retention figure with the test conditions named | The vacuum is the product. A retention figure without the starting temperature, the volume and the ambient condition is not comparable with anything, including your next quote. |
| Anything a customer drinks from | The material declaration for every food-contact component, including the gasket | The steel is the part buyers think about and the lid liner is the part that usually fails. Each component that touches the drink has to be covered, and the gasket is a separate material. |
| A printed or coated product | The decoration method by name, plus a dishwasher test and an adhesion test | Dishwashers are where printed drinkware fails. A design that survives a hand wash and not a dishwasher is a design that generates complaints in the third month. |
| A product for children | A different testing plan, agreed before the mould is cut | Children's drinkware carries rules that adult drinkware does not, and the lid is where they usually apply because it is the part that comes apart. |
| A custom shape nobody sells yet | The mould cost as its own line, with the tool drawings, and one colour and one capacity to start | Every capacity and every colour multiplies the minimum. A range of five sizes is five times the tooling, not one order divided by five. |
| A stock shape with your own print | The stock model number written into the order, not a photograph | Suppliers hold many similar shells. A photograph will match three of them, and the one you approve the sample on is not always the one that gets produced. |
1. What a Drinkware Quotation Actually Covers
A drinkware product is a steel shell, a vacuum, a lid, a print, and a box, and the five are supplied by different parts of the same factory or by different factories. A unit price that does not break them out cannot be compared with anything, which is why two quotes for the same tumbler can differ by half and neither supplier is lying.
- The shell
- Stainless steel coil, drawn and formed. Priced by weight, and the weight follows the wall thickness and the capacity, so a larger bottle costs more in material rather than more in labour.
- The vacuum
- The step that is not visible in the finished product. It adds machine time and a furnace or vacuum line, and it is the reason a working insulated bottle cannot be made cheaply.
- The lid
- Usually a moulded plastic assembly with a gasket and often a sliding or flip mechanism. Bought in as a component, with its own mould, its own minimum and its own supplier.
- The decoration
- Powder coating, printing, laser engraving or a combination. Priced per unit and set up per design, so each additional design or colour is its own run.
- The packing
- The box, the sleeve and the insert. Cheap per unit, and the part of the order that is easiest to change later.
2. Stainless Steel: 304 Against 316
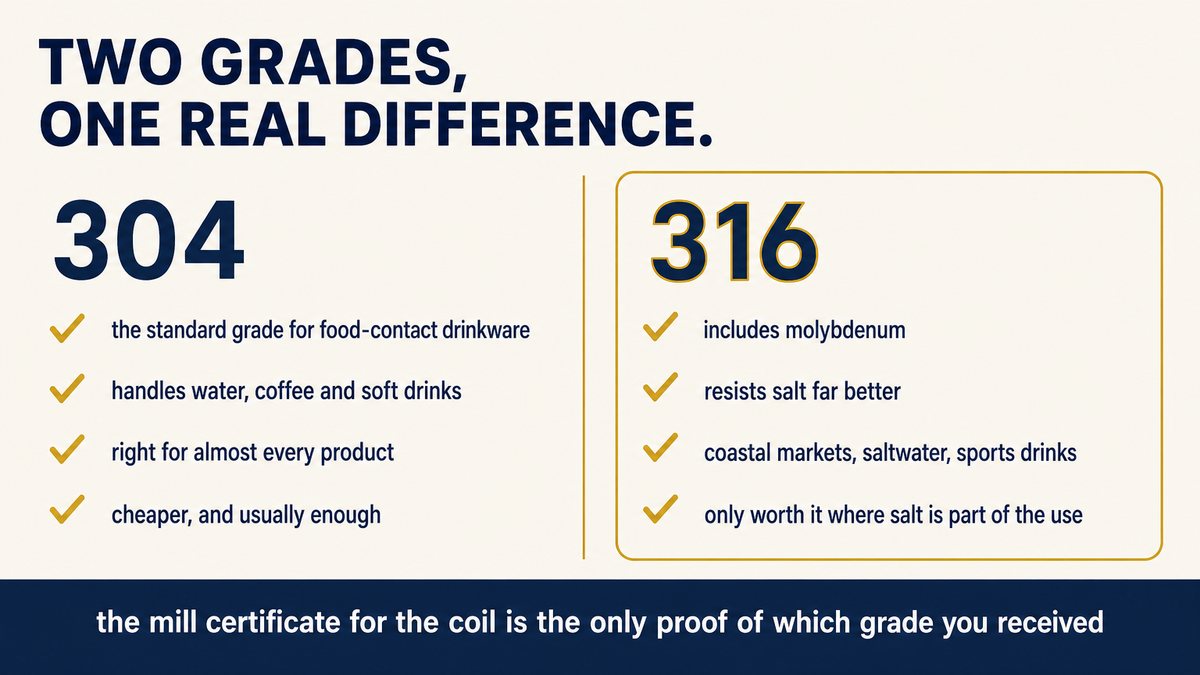
Drinkware steel is specified by grade, and the two grades that matter are 304 and 316. Buyers often treat the higher number as a straight upgrade and pay for it without asking whether the product needs it, so it is worth knowing what the difference actually buys.
| Grade | What it is chosen for | Where it is worth the extra cost |
|---|---|---|
| 304 | The standard grade for food-contact drinkware, and the one most products use. It resists the corrosion that ordinary water, coffee and soft drinks cause. | Almost everything. For a normal tumbler used for water and coffee, 304 performs correctly and 316 is money spent on a problem the product does not have. |
| 316 | The grade chosen where chlorides are present, because the alloy includes molybdenum, which improves resistance to salt. Marketing often calls it marine grade. | Coastal markets, saltwater use, electrolyte and sports drinks, and any product whose selling story is corrosion resistance. Also worth it where a customer might leave a bottle with a salty drink in it for days. |
The word on the box you should be able to explain
Packaging often carries a figure written as 18/8 or 18/10. That is a reference to the chromium and nickel content of the alloy, and it is a shorthand for the grade rather than a separate specification. If you print it on your own packaging, be able to say which grade it refers to and hold a document that supports it, because it is a material claim about the product.
The document that settles the question
A mill certificate is the record of what was actually in the coil that went into your order, and it is what a supplier sends when they are telling the truth about the grade. Ask for it by that name. A supplier who can produce a certificate for the coil used on your production run is a supplier who buys steel properly, and one who cannot is asking you to take the grade on trust.
This is also where a cheap quote is explained. Two quotes for the same bottle can differ because one is using a lower grade of steel than the other, and the difference is invisible in the finished product until it rusts or develops a taste. Our factory audit guide covers how to confirm whether a supplier runs the vacuum and finishing steps in-house or buys finished shells in, which is the other common reason for a gap between quotes.
3. Vacuum Insulation: The Step That Decides Whether It Works
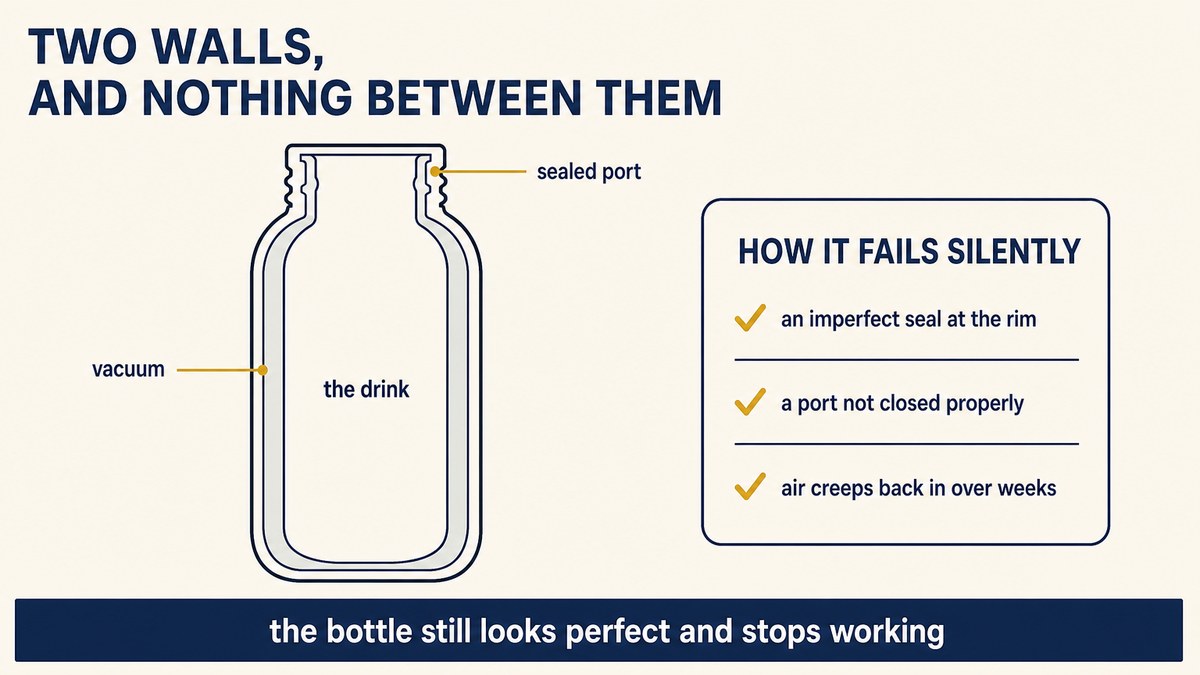
An insulated bottle is two steel walls joined at the rim, with the air drawn out of the space between them and the opening sealed. That is the whole principle, and it explains both why the product works and how it fails.
Heat moves through a solid, through a moving fluid, and by radiation. Emptying the gap removes the fluid, which is the largest of the three, and that is what makes a vacuum flask dramatically better than a single wall. The walls still conduct a little where they meet, and radiant heat still crosses the gap, which is why some designs add a thin reflective layer inside the vacuum space to cut radiative loss. Every bit of the performance, in other words, depends on the gap staying empty.
How a vacuum bottle fails without looking broken
If the seal at the joining rim is imperfect, or the small port where the air was drawn out is not closed properly, air creeps back in over time. The product does not change appearance. It simply stops keeping drinks cold, gradually, usually after the customer has had it for a few weeks. This is the failure mode that turns into a review that says "worked at first".
Three practical consequences follow, and each one belongs in your specification.
- Test retention on a sample and again on production. A retention figure is only meaningful with its conditions: the starting temperature, the volume of liquid, how full the vessel is, the ambient temperature and the time. Ask for all five, because a result quoted without them cannot be compared with a competitor's or with your own last order.
- Test after abuse, not only when new. Drop the sample, then measure retention again. A bottle whose vacuum survives a drop is a different product from one whose seal holds only until it is knocked off a table.
- Ask whether the vacuum step is in-house. Drawing a vacuum is capital equipment and a process to run. A supplier who forms and coats shells but buys in finished insulated bodies is a supplier who cannot tell you why your last batch underperformed, because the step that decides performance is not theirs.
Test retention with the lid on and again with the lid off. A surprising share of "the bottle does not keep drinks cold" complaints are lid problems rather than vacuum problems, because a lid that does not seal lets warm air circulate over the surface of the liquid. Running both tests tells you which half of the product you are actually fixing, and it costs nothing to add.
4. Lids, Gaskets and Straws: Where Leaks Come From
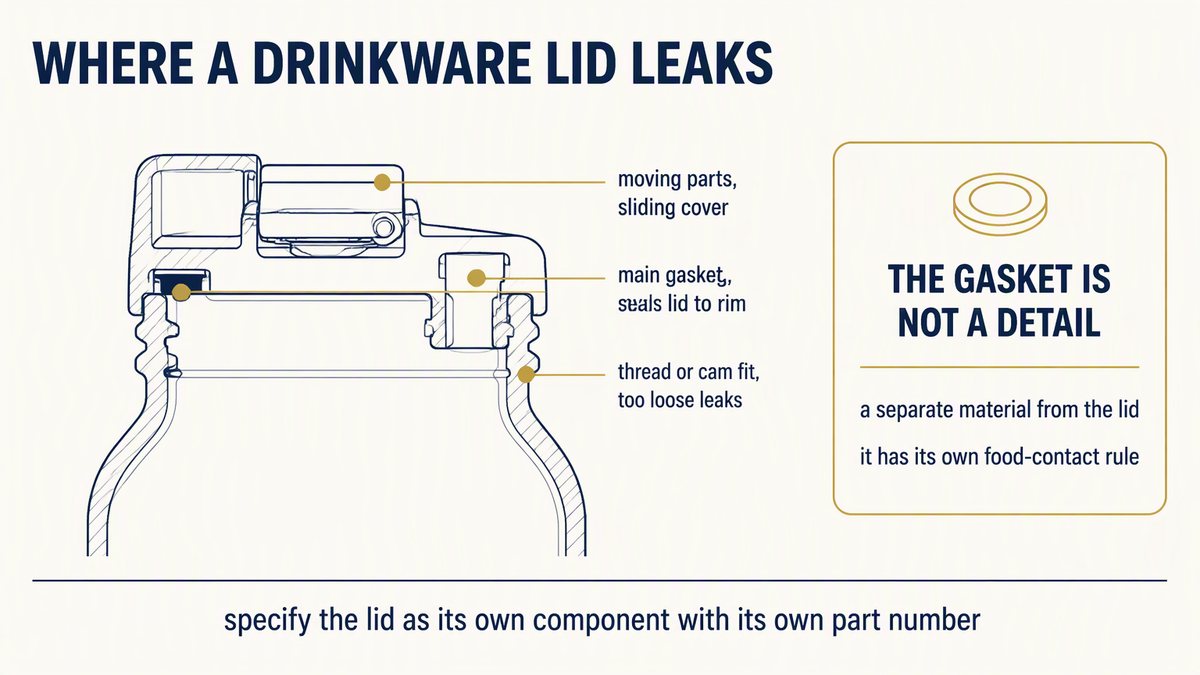
The lid is the least visible component and the most common cause of returns. It is also the component with a rule of its own, which is covered in section 6. Four points on a lid decide whether it works.
One habit saves most of the trouble here. Ask for the lid to be specified as its own line item with its own part number or drawing, so that a later order cannot quietly arrive with a different lid from the one you approved. Lid substitution is a common way for a quote to fall, because a cheaper lid is invisible in a photograph and obvious only when the bottle leaks.
5. Decoration: Powder Coat, Sublimation, UV and Laser
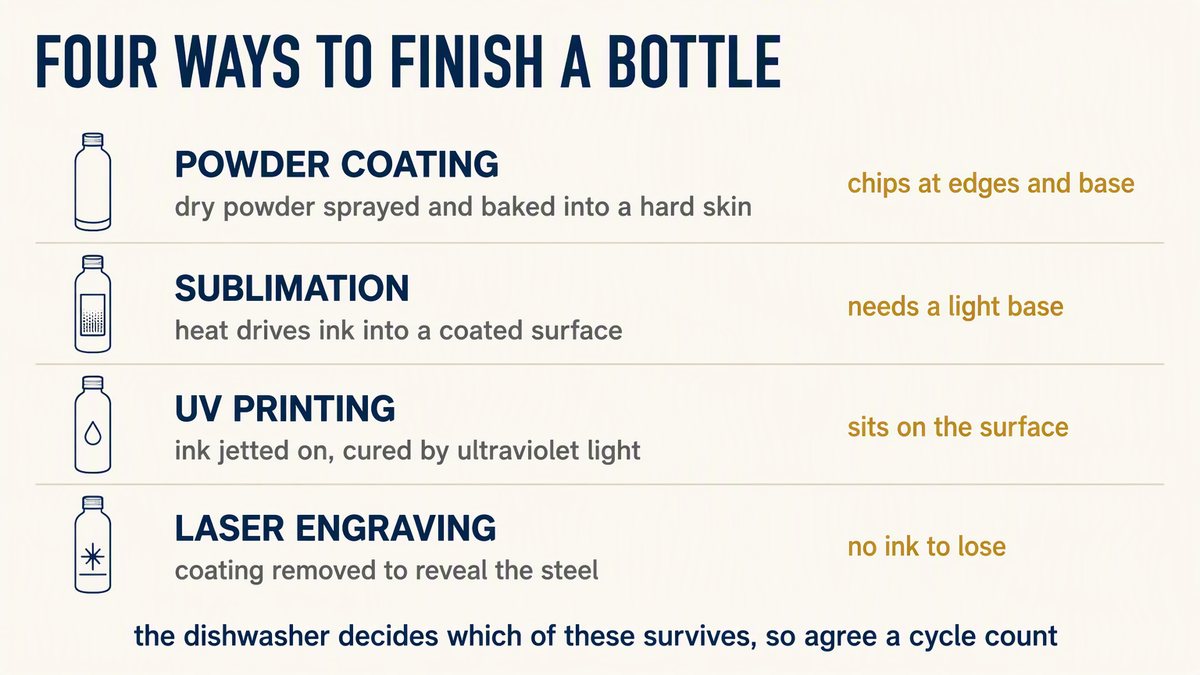
Decoration is where a drinkware range earns its price and where it most often disappoints. Four methods cover most production, and they differ in how much punishment they take.
| Method | How it works | Where it fails |
|---|---|---|
| Powder coating | Dry powder is sprayed onto the steel and baked into a hard, even skin. It is the standard finish for coloured tumblers and it gives the product its grip and its feel. | At edges, and at the base where the bottle is put down. A thin coat chips, and a chip in a coloured coat exposes bare steel, which is far more visible than the same chip in a brushed finish. |
| Sublimation | Heat turns ink into gas that sinks into a coated surface. It is how full-colour designs and photographs get onto a curved tumbler. | Needs a coated or light base, so it does not work over a dark powder coat. Prints can look slightly soft compared with a crisp printed line. |
| UV printing | Ink is jetted onto the surface and cured with ultraviolet light. Handles fine detail and small runs without a set-up plate. | Sits on the surface, so it is the method most exposed to scratching and dishwasher wear. Adhesion depends on the surface treatment before printing. |
| Laser engraving | A laser removes the coating to reveal the steel underneath, or marks the bare metal. | Permanent, because there is no ink to lose. It works within the colours present in the material, so a coloured design is not available. |
Two tests belong on every decorated drinkware order, and neither is expensive. The first is an adhesion test: a grid of cuts through the decoration, tape pressed over it and pulled away, with the amount that lifts rated against a published scale, the method known as ASTM D3359. The second is a dishwasher test, run for a stated number of cycles, followed by the same adhesion check. If the product is going to be washed in a machine, the number of cycles matters and should be written down, because "dishwasher safe" without a cycle count is a claim rather than a specification.
Where your logo has to work across the bottle, the box and the tag, the same artwork file will behave differently on each surface. Our custom logo printing and finishing guide covers how the options differ across those three.
6. Food Contact: The Rules That Apply to a Drinking Vessel
A bottle or tumbler is a food-contact article, which puts the materials in it under the federal rules for indirect food additives. Almost every supplier will say their product is "food grade". Almost none will send you the paperwork that shows which rule each component sits under, and that is the part you need, because the declaration is the evidence and the phrase is not.
What the rules require of a component
Under 21 CFR Part 174, a substance used as a component of an article that contacts food has to fall into one of five categories. It is either generally recognised as safe in or on food, or generally recognised as safe for its intended use in food packaging, or used under a prior sanction or approval, or permitted by one of the regulations in Parts 175, 176, 177 and 178 and one section of Part 179, or it is a food contact substance used under an effective premarket notification made under section 409(h) of the Act.
The same part sets the manufacturing rule that goes with it. The amount of any substance that may end up in the food as a result of being used in a food-contact article must not exceed what results from using no more than is reasonably needed to achieve the intended effect, must stay within any limit the rules prescribe, and must not be intended to produce any physical or technical effect in the food itself. Any substance used as a component has to be of a purity suitable for its intended use.
Part 174 also allows substances that migrate at negligible levels to be exempted from being treated as food additives, under the process in §174.6. That provision is why some components arrive with a notification number rather than a regulation reference, and it is a legitimate answer rather than an evasion — but it still has to come with a document.
Where the lid comes in
This is the part that almost nobody covers, and it is where a reusable bottle differs from a disposable container. 21 CFR Part 177 covers polymers used as indirect food additives. Within it, subpart B covers substances used as basic components of single and repeated use food contact surfaces, and subpart C covers substances for use only as components of articles intended for repeated use — which is exactly what a reusable bottle or tumbler is. And one section addresses the specific object you are worried about: closures with sealing gaskets for food containers.
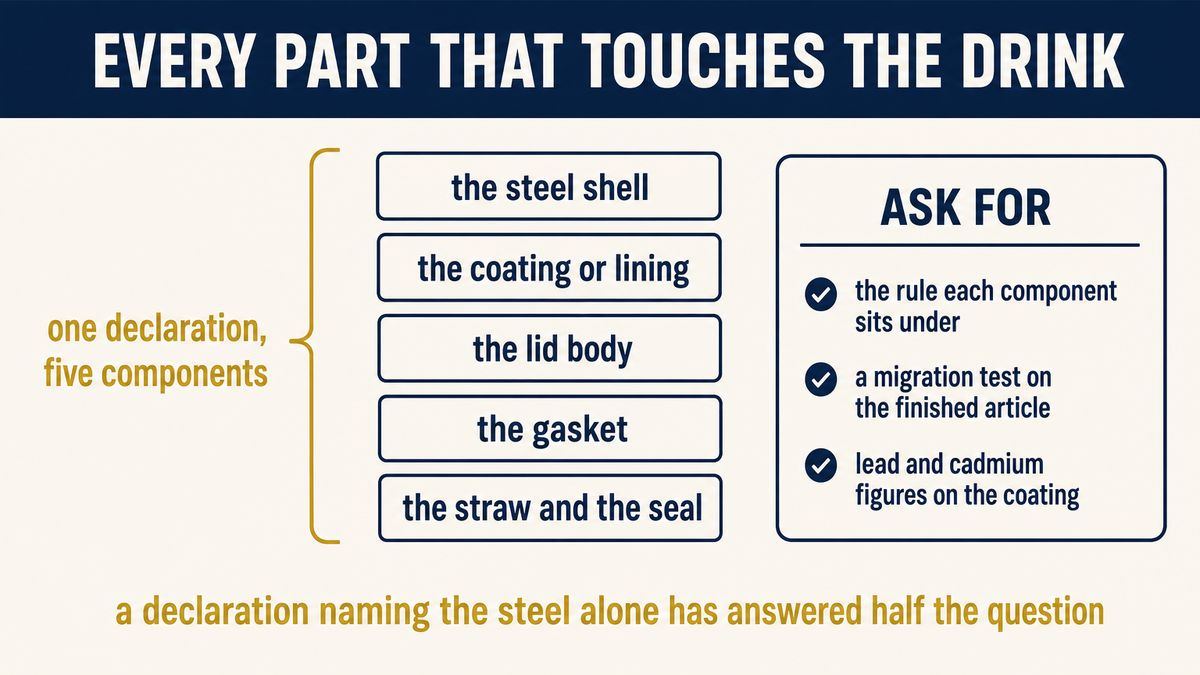
So the gasket in your lid is not a detail on the edge of the rules. It is a defined category within them, with its own section, and it is a different material from the steel and from the lid body. A material declaration that covers the steel shell and stops there has not covered the component most likely to be questioned.
What to ask for, in four lines
- A material declaration covering every food-contact component. The steel, the coating or lining that touches liquid, the lid body, the gasket, the straw if there is one, and any seal in the cap. Each one named, with the regulation or notification it sits under.
- A migration or extractives test report on the finished article, not on a raw material pellet. The finished product is what a customer drinks from, and testing the steel on its own does not test the assembly.
- Heavy-metal results on any coating or decoration. The powder coat and the print are separate materials from the steel and carry their own risk. Ask for lead and cadmium figures rather than a statement that the product is safe.
- An odour and taste check on a new product, with the lid fitted. Fill it with cold water, leave it closed for a few hours, then smell and taste. This is the test the rules themselves acknowledge, and no certificate replaces it.
7. Testing a Drinkware Sample
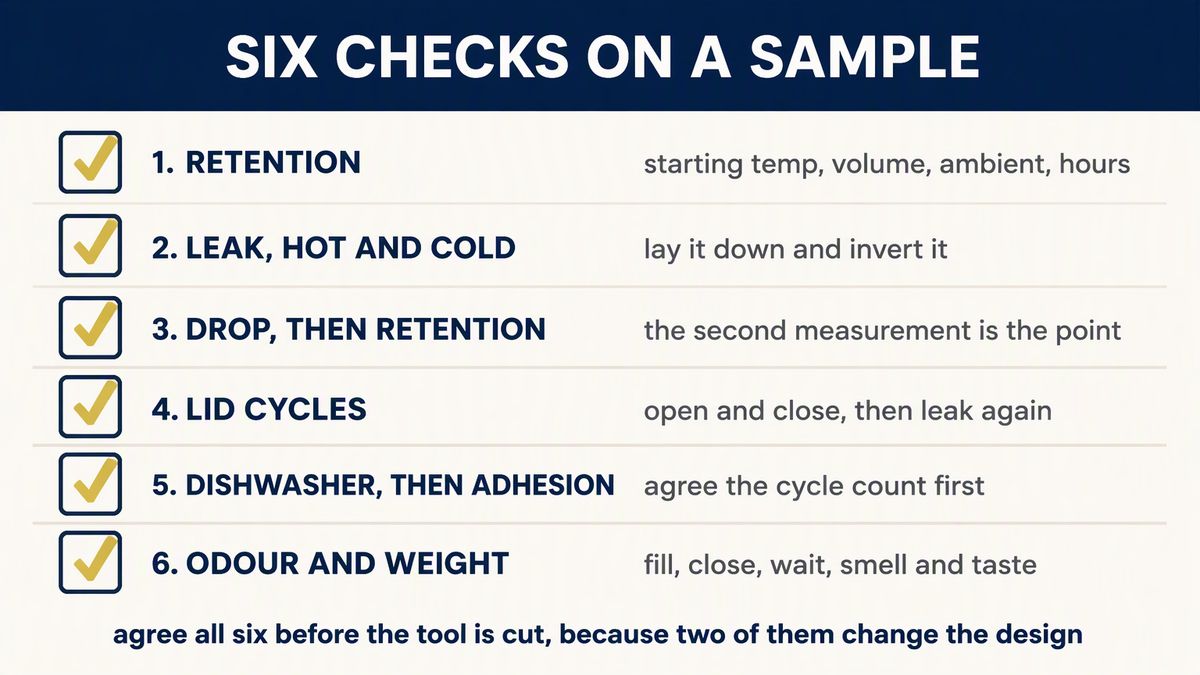
Run six checks on a sample from the production tool, and run the important ones again on the first delivery. A sample is made slowly and inspected carefully; a production batch is neither, and the gap between them is where a good sample becomes a bad shipment.
- Thermal retention, with the conditions written down. Starting temperature, volume of liquid, how full the vessel is, ambient temperature and elapsed time. Add a second measurement with the lid off, so you can tell a lid problem from a vacuum problem.
- Leak test, run hot and again cold. Fill it, close it, lay it on its side and invert it. Hot liquid raises the pressure inside and behaves differently from cold, so a bottle that passes a cold leak test can still fail when someone puts coffee in it and drops it in a bag.
- Drop test, then re-test retention. This is the check that finds a weak seal, because losing the vacuum is what a bad weld or a poor seal shows up as. Without the second retention measurement, the drop test proves only that the outside did not break.
- Lid cycle test. Open and close the lid a stated number of times, then repeat the leak test. A mechanism that seals for the first twenty uses and leaks on the hundredth is a mechanism you want to find out about before your customer does.
- Dishwasher cycles, then the adhesion test. A stated number of machine cycles, followed by the tape test on the decoration. Agree the cycle count in advance, because it is the difference between a claim you can defend and one you cannot.
- Odour and taste, and weight. The smell and taste check described above, plus the finished weight against the specification, which is the fastest way to find a shell that is thinner than the one you approved.
Agree all six before the tool is cut, not after the sample arrives, because two of them affect the design. A lid that cannot pass a cycle test is a lid that needs a different mechanism, and that is a mould decision. Our first article inspection guide sets out the pattern for agreeing the numbers up front, and the pre-shipment inspection guide covers how to write the brief so the report comes back with measurements rather than an opinion.
8. Minimum Order, Custom Shapes and the Mould Question
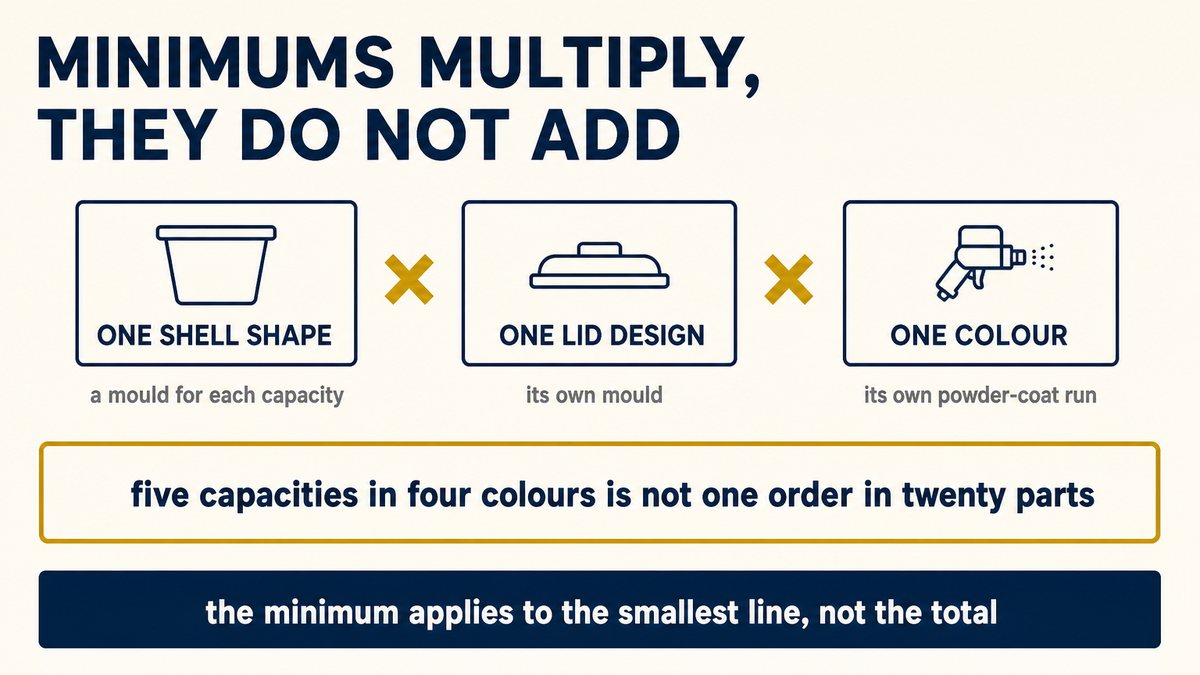
Drinkware minimums multiply rather than add, and understanding which line multiplies is what keeps a first order affordable.
Three things each carry their own tooling and their own run. The shell has a mould for each capacity and each profile. The lid has a mould for each design. The decoration has a set-up for each design and, where the finish is a powder coat, a run for each colour. A range of five capacities in four colours is not one product ordered twenty ways; it is five shells, twenty colour runs and a set of lids, and the minimum applies to the smallest of those.
| Route | What you pay for | What it means |
|---|---|---|
| Stock shell, stock lid, your own print | A printing set-up and your artwork | The lowest entry point and the fastest to market. You do not own the shape, so the same shell is available to anyone who wants it. |
| Stock shell, your own colour and finish | A powder-coat run plus the decoration | The middle step, and the usual first order. You find out how the supplier performs, and the product stops looking like everyone else's. |
| Your own shell and lid design | Two moulds, the design work, and the first production run | The only route to a product nobody else has. Treat the tooling as a separate decision from the production order, and settle who owns the tools in writing before they are cut. |
One more point about custom shapes. A new profile is not only a mould cost; it is a new set of tolerances to agree, including how the lid seats on the new rim. If you are changing the shell, expect to re-run the leak and cycle tests rather than assuming the existing lid will perform on a different body, because the seal is a fit between two parts and only one of them is new.
9. A Five-Step Sourcing Roadmap
- Fix the construction before the decoration. Single wall, double wall vacuum, or a travel mug with a handle. The construction decides the price, the tooling and the tests, and the print is a decision you make afterwards.
- Name the grade and ask for the mill certificate. 304 for ordinary products, 316 where salt is part of the use case, and the certificate for the coil as the evidence.
- Specify the lid as its own component. Its own part number, its own gasket material, and the sealing method described. Lids get substituted silently, and a substituted lid is the return you will not see coming.
- Get the food-contact declaration covering every component that touches the drink. Steel, coating, lid body, gasket, straw and seal, each with the rule or notification it sits under, plus a migration report on the finished assembly.
- Agree the six tests before the tool is cut, and repeat the critical ones on the first delivery. Retention with conditions, drop then retention again, leak hot and cold, lid cycles, dishwasher cycles with an adhesion test, and the odour check.
Everything in this guide sits inside our Home & Daily Products sourcing hub, which collects the kitchen, household and everyday-product guides in one place.
10. Frequently Asked Questions
Is 316 stainless worth the extra cost over 304?
For most drinkware, no, and for some products, yes. 304 is the standard grade for food-contact drinkware and it handles water, coffee and soft drinks correctly, so a normal tumbler paying for 316 is paying to solve a problem it does not have. 316 contains molybdenum, which is what improves resistance to salt, and that is where it earns its cost: coastal markets, saltwater use, electrolyte and sports drinks, and any product whose whole story is corrosion resistance. The practical test is not which grade is better but whether the product will meet salt, and whether the extra cost can be passed on as a selling point. In both cases, ask for the mill certificate for the coil, because the document is what tells you which grade you actually received.
Why does my insulated bottle stop keeping drinks cold after a few weeks?
In most cases the vacuum has been lost. An insulated bottle is two steel walls joined at the rim with the air drawn out of the gap between them and the opening sealed. If the seal at the rim is imperfect, or the port where the air was drawn out is not closed properly, air creeps back in over time. The product does not change appearance at all — it simply performs worse, usually after the customer has had it a few weeks, which is why the complaint tends to read "worked at first". The way to catch it before your customers do is to measure retention on a sample, drop the sample, and then measure retention again. A bottle whose vacuum survives a drop is a different product from one whose seal only holds until it is knocked off a table.
What does "food grade" actually mean for a water bottle?
On its own, very little, because it is a phrase rather than a document. What it should mean is that every component that touches the drink is covered by the federal rules for indirect food additives, and that you can produce the paperwork to show it. Under 21 CFR Part 174 a substance used as a component of an article that contacts food has to fall into one of five categories — generally recognised as safe in or on food, generally recognised as safe for use in food packaging, used under a prior sanction, permitted by the regulations in Parts 175 to 178, or covered by an effective premarket notification under section 409(h). So the useful question is not whether the product is food grade, but which of those categories each component sits in, and on what document. A declaration naming the steel and stopping there is not an answer.
Why does my new bottle smell of rubber?
Almost always the gasket in the lid rather than the steel, and the rules themselves acknowledge that this can happen with a properly permitted material. 21 CFR Part 174 states that a regulation permitting a substance does not relieve the article from the rest of the Federal Food, Drug, and Cosmetic Act, and gives the example of a regulated material that on testing imparts odour or taste to food so as to make it unfit — in which case the regulation does not help. In plain terms, a gasket can be made of an allowed material and still be the reason your product smells. The response is a smell and taste check on every new product as part of sampling: fill it with cold water, fit the lid, leave it closed a few hours, then smell and taste it. Nothing on a certificate replaces that test, and the fix is a different gasket material rather than a longer airing out.
Will my printed logo survive a dishwasher?
It depends entirely on the method, which is why the method belongs in the specification rather than in a conversation. UV printing sits on the surface and is the most exposed to both scratching and dishwasher wear. Sublimation drives the ink into a coated surface, so it is more durable but needs a light base. Laser engraving removes material rather than adding ink, so there is nothing to wash off, though it works within the colours already present. And a powder coat is a finish rather than a print, so a chip in it exposes bare steel. The way to settle it is a dishwasher test for a stated number of cycles followed by an adhesion test, and to write both the cycle count and the method into the order. "Dishwasher safe" without a cycle count is a claim, not a specification.
What is the minimum order for a custom tumbler?
It depends on which parts are yours, and drinkware minimums multiply rather than add. Three things each carry their own tooling and their own run: the shell has a mould for each capacity and profile, the lid has a mould for each design, and the decoration has a set-up for each design plus a run for each colour where the finish is a powder coat. So a range of five capacities in four colours is not one product ordered twenty ways — it is five shells and a set of colour runs, and the minimum applies to the smallest line. The usual first order is a stock shell and stock lid with your own printing, which carries the lowest minimum and lets you find out how a supplier performs before you pay for tooling.
Get the Construction, the Lid and the Paperwork Right First
Our team writes the construction and material specification, specifies the lid and its gasket as separate components, collects the food-contact declaration for every part that touches the drink, and runs the retention, drop, leak and dishwasher checks on the sample and again on the first delivery.
Request a Drinkware Sourcing Quote
Questions & Comments
We read every one and reply within 24 hoursCOMMENTS INTRO FOR THIS ARTICLE — write a topic-specific question prompt here.